Property Table Components
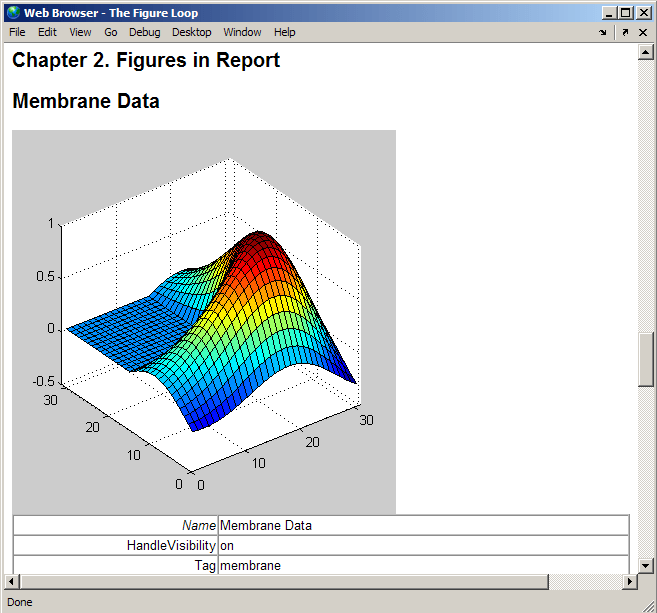
Property Table components display property name/property value pairs for objects in
tables. The following example shows a property table from the
figloop-tutorial report.
Many types of property table components are available, including:
MATLAB® Property Table
Simulink® Property Table (requires Simulink Report Generator™)
Stateflow® Property Table (requires Simulink Report Generator)
The component used in this example represents MATLAB Report Generator property table components, all of which exhibit similar behavior.
Open the Example Report Template
This example uses the figloop-tutorial report template. To open the
report template and display the Handle Graphics figures, at the MATLAB command prompt,
enter:
openExample("rptgen/FigureLoopReportExample")Examine the Property Table Output
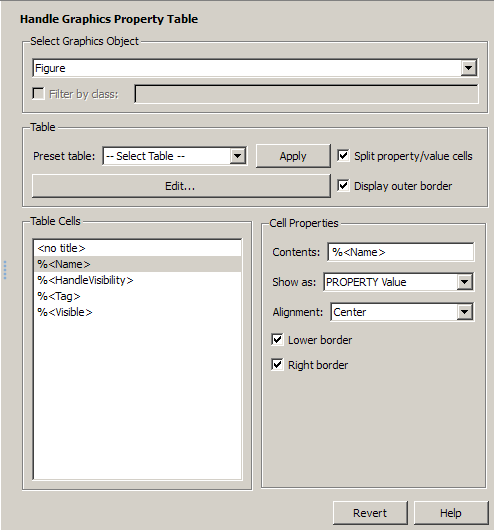
Property pages for all property table components are similar in form. In the Outline pane, select the Figure Prop Table component. To modify table settings, in the Handle Graphics® Property Table dialog box, click the Edit... button.
Select Object Types
Property table components offer multiple object types on which to report. For example, the Handle Graphics Property Table lets you report on a figure, an axes object, or a Handle Graphics object.
You can select a different object type on which to report in the Object type list in the Properties pane for the component.
Display Property Name/Property Value Pairs
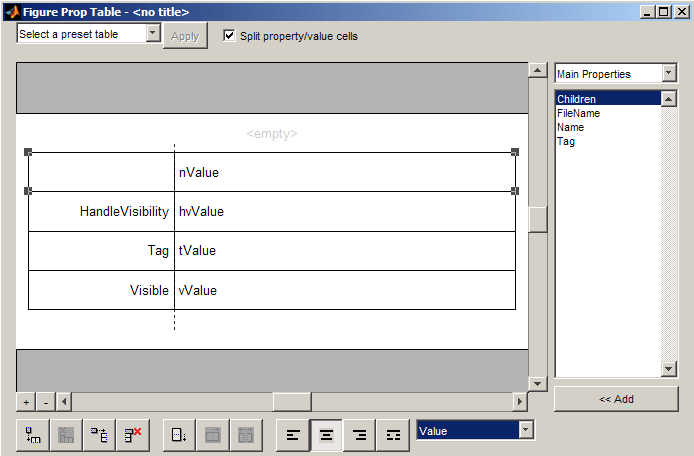
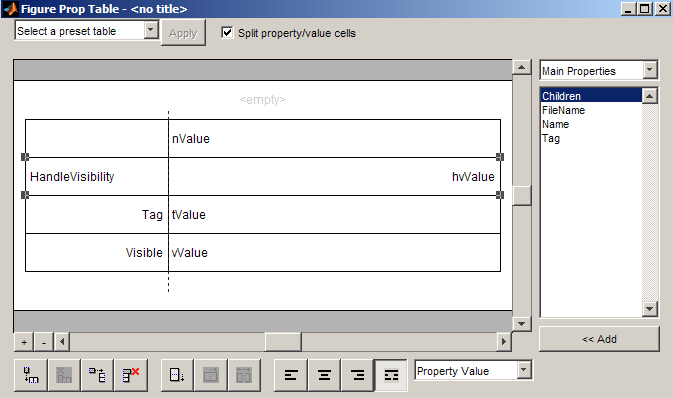
Split Property/Value Cells
In the Properties pane for the Handle Graphics Property Table component, clear the Split property/value cells check box.
Click Edit. The table is now in non-split mode. Non-split mode supports more than one property name/property value pair per cell and text.
For the property name and property value to appear in adjacent horizontal cells in the table, select the Split property/value cells check box. The table is now in split mode. Split mode supports only one property name/property value pair per cell. If more than one property pair appears in a cell, only the first pair appears in the report; all subsequent pairs are ignored.
Display Options
Property name/property value pairs can appear in cells in several ways. To specify how
a given property name/property value pair appears in a cell, select that field in the
table (for this tutorial, select the Name property). Choose
Value from the display options drop-down list at the bottom
of the dialog box. In the selected table row, only the value appears.
Format Options
To specify alignment for text in a given cell, in the toolbar at the bottom of the dialog box use the four justification buttons.
Select the HandleVisibility table row. Then select the double-justify button (the last button to the right).
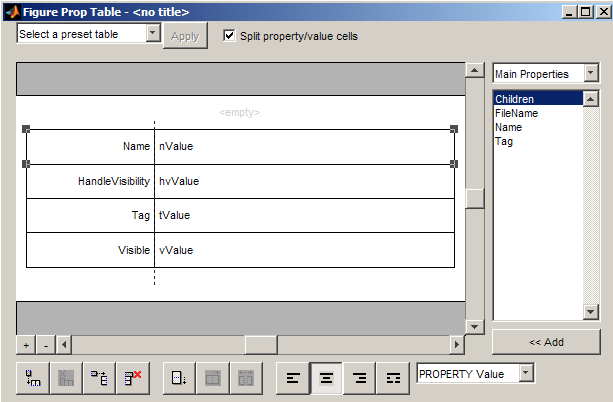
Edit Table Titles
Table titles can contain properties and text. By default, the title of a table is the
same as the value of the %<Name> property. You can modify this
property to modify the table title.
Note
Table titles are always in non-split mode.
Enter Text into Table Cells
For the text to be visible, the table must be in non-split mode. Clear Split property/value cells.
To enter text into the HandleVisibility table cell, double-click the cell. A gray box appears with the label for the cell property.
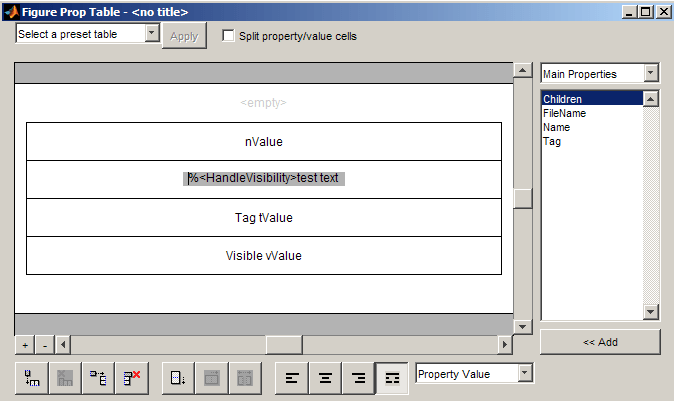
If you type text outside the angle brackets, the text appears as is in the report. Text inside the angle brackets must specify a valid property name. If you enter an invalid property name, the property name appears in the report without a property value.
Add, Replace, and Delete Properties in Tables
Adding Table Properties
To add a Handle Graphics property to a table, use the following steps.
In the Figure Property Table window, select a table row above which you want add a new property.
Click the Add Row Above Current Cell
 button
A new row appears above the current row.
Add the property to the new table row.
Select the new table row.
In the Properties Type drop-down list at the upper-right of the dialog box, select a property type.
In the Properties list, select the property you want to add.
Click the << Add button, or double-click the property name. The property appears in the table row.
Alternatively, if you know the name of the property you want to add, enter the property name directly into the cell as described in Enter Text into Table Cells. For information about adding new table rows, see Add and Delete Columns and Rows.
Replace Table Properties
To replace a property in a cell of a table in split mode, follow the instructions in Adding Table Properties.
Note
You cannot use these steps to delete a property in a cell when the table is in non-split mode.
Delete Table Properties
Delete a property by backspacing over it or using the Delete key.
Format Table Columns, Rows, and Cells
Add and Delete Columns and Rows
To add or delete a column or row, select a cell and then click one of the buttons described in the following table.
Note
You cannot delete a row or column when it is the only row or column in the table.
Button | Action |
|---|---|
Add column (added to the left of the selected column) | |
Delete selected column | |
Add row (added above the selected row) | |
Delete selected row |
Resize Columns
To resize the width of a column, click and drag its vertical borders as needed.
Merge and Split Cells
To merge or split table cells, select a row and then click one of the buttons described in the following table.
Button | Action |
|---|---|
Merge cells downward | |
Merge cells to the right | |
Split cells |
Display or Hide Cell Borders
To toggle cell borders on and off:
Place your cursor in a cell and right-click to invoke its context menu.
Choose Cell borders > Top, Bottom, Right, or Left to toggle the specified border on or off.
Zoom and Scroll
You can zoom in and out of the table with the zoom buttons, which are located to the left of the horizontal scroll bar.
Button | Action |
|---|---|
|
| Zoom in |
|
| Zoom out |
You can scroll vertically and horizontally using the table scroll bars.
Select a Table
To display property name/property value pairs, you can select a preset table or use a custom table.
A preset table is built-in and formatted. You can select a preset table in the preset table selection list in the upper-left of the Figure Prop Table window. To apply a preset table, select the table and click Apply.
To create a custom table, select a preset table and modify it to fit your needs by adding and/or deleting rows and properties. You may want to start with the Blank 4x4 preset table.
Note
You cannot save a custom table as a preset table. If you do so, you lose all changes to the custom table.