Prepare MATLAB Function for Code Generation
In this step, you prepare a function for code generation and add it to a MATLAB® Coder™ project by using the MATLAB Coder app.
Examine MATLAB Function
This tutorial uses the MATLAB function collatz, which tests the unsolved Collatz conjecture. The conjecture asks whether, for a positive integer n, repeatedly applying two rules produces a sequence that reaches 1:
If the number is even, divide it by 2
If the number is odd, multiply it by 3 and add 1
Examine the collatz function in the file collatz_pre.m.
type collatz_pre.mfunction seq = collatz(n)
seq = n;
while seq(end) ~= 1
if mod(seq(end),2) == 0
seq(end+1)=seq(end)/2;
else
seq(end+1)=3*seq(end)+1;
end
end
end
Add %#codegen Pragma
Add the %#codegen pragma to the collatz function. This pragma prompts the Code Analyzer in the MATLAB Editor to identify potential issues specific to code generation in your MATLAB Code.
Open the file collatz_pre.m in the MATLAB editor, and add the %#codegen pragma after the function declaration.
edit collatz_pre.m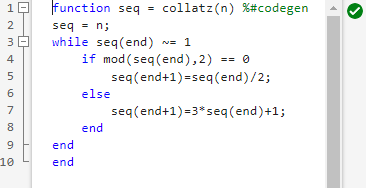
The Code Analyzer displays a green checkmark icon ![]() , which indicates that it did not find any warnings or errors in this function. Save the file as
, which indicates that it did not find any warnings or errors in this function. Save the file as collatz.m.
Open MATLAB Coder App
To generate code by using the MATLAB Coder app, you must first create a MATLAB Coder project. MATLAB Coder project files have the file extension .``coderprj. The project file contains the information that you provide to the code generator, including the paths of the MATLAB Coder entry-point functions, their input types, global variables, and the code generation configuration parameters.
To create a MATLAB Coder project:
In the Apps tab of the MATLAB Toolstrip, click MATLAB Coder. The app opens the Create MATLAB Coder Project dialog box.
Enter the name of the project file and the folder in which you want to place the file. For this example, create a file named
collatz.coderprjin your current working folder.
The MATLAB Coder tab opens. In the tab, each section corresponds to the different steps you perform when generating code, including preparing your MATLAB code for C/C++ code generation, generating code, performing verification on generated code, viewing the code generation report, and exporting the generated code.

The MATLAB Coder panel also opens. The Next Steps section displays messages to guide you through the code generation steps, and the Input and Output sections summarize the code generation inputs and outputs.
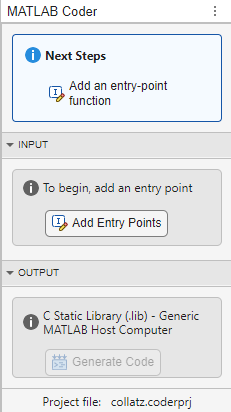
In this example, the Next Steps section instructs you to add an entry-point function.
Add Entry-Point Function
An entry-point function is a function that you want to access directly from your custom C or C++ code. Often, this function is a top-level function that calls all of the other MATLAB functions in your application. Because entry-point functions are stable interfaces to the generated code, you can regenerate C or C++ code from your MATLAB code without needing to change the calls to this function from your custom application. In this example, the entry-point function is collatz.
To add an entry-point function:
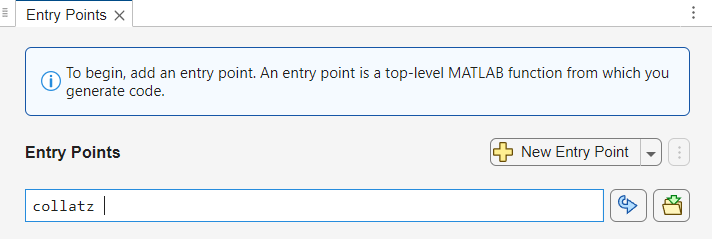
In the MATLAB Coder tab, click the Entry Points button.
The Entry Points tab opens. Enter the name of the entry-point function,
collatz.
The app runs the code generation readiness tool on the entry-point function. This tool screens the MATLAB code for features and functions that are not supported for code generation. If the app identifies issues with an entry-point function or one of its dependencies, it displays a warning message in the Entry Points tab. For more information, see Code Generation Readiness Tool.
In this example, the app does not detect code generation readiness issues in the collatz function. The app displays an error icon because the input types to the entry-point function are not defined.
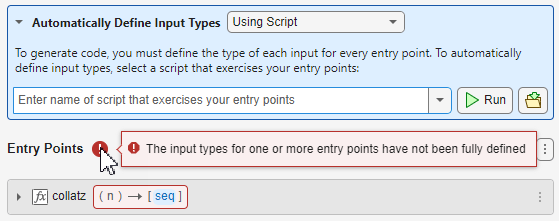
In the next step of this tutorial, you define the input types.