Create Custom Automation Algorithm for Labeling
R2026bThis topic shows how to implement a custom automation algorithm using a class-based interface to accelerate ground truth labeling across labeling apps such as Image Labeler (Computer Vision Toolbox), Video Labeler (Computer Vision Toolbox) and Multi-Sensor Labeler. The labeling apps enable you to label ground truth for a variety of data sources and automatically label your data by creating and importing a custom automation algorithm.
To build a custom automation algorithm for labeling apps, you can use either a function-based or class-based interface. The apps provide templates for both interface types. The table below compares their capabilities to help you choose the right interface for your workflow:
| Automation Algorithm Interface Type | Description | Use Case & Capabilities |
|---|---|---|
Function-based | Define automation logic using a standalone function with parameter tuning. |
|
Class-based | Create a custom class inheriting from |
|
For more information about the function-based automation algorithm interface, see Create Automation Algorithm Function for Labeling (Computer Vision Toolbox).
Create and Implement Automation Algorithm
The vision.labeler.AutomationAlgorithm (Computer Vision Toolbox) class
enables you to define a custom label automation algorithm for use in the labeling apps.
You can use the class to define the interface used by the app to run an automation
algorithm.
To define and use a custom automation algorithm, you must first define a class for your algorithm and save it to the appropriate folder.
Create Automation Class Using Template from Labeler App
At the MATLAB® command prompt, enter one of these commands to open the relevant labeling app.
imageLabeler
videoLabeler
multiSensorLabeler
Load a data source and create at least one label definition.
On the app toolstrip, select Select Algorithm > Add Algorithm > Create New Algorithm.
This opens the
vision.labeler.AutomationAlgorithmclass template where you can define your custom automation algorithm. The template has headers and comments with instructions.
Extend Automation Class for Temporal Data
If the algorithm is time-dependent, that is, has a
dependence on the timestamp of execution, your custom automation algorithm must also
inherit from the vision.labeler.mixin.Temporal (Computer Vision Toolbox) class. Temporal algorithms are useful for
labeling videos using the Multi-Sensor
Labeler and Video
Labeler (Computer Vision Toolbox) apps. For more details on implementing time-dependent, or
temporal, algorithms, see Temporal Automation Algorithms (Computer Vision Toolbox).
Implement Core Methods of Automation Algorithm Class
The following table outlines the key methods you implement in a custom automation algorithm class. These methods define how the algorithm behaves during execution within the labeling apps:
| Method | Purpose |
|---|---|
checkLabelDefinition (Computer Vision Toolbox) | Validate which label types are compatible with your algorithm |
settingsDialog (Computer Vision Toolbox) | Define custom settings dialog for user interaction (optional) |
checkSetup (Computer Vision Toolbox) | Verify readiness before execution such as any user-setups (optional) |
initialize (Computer Vision Toolbox) | Prepare algorithm state before processing frames |
run (Computer Vision Toolbox) | Core algorithm logic to process each frame |
terminate (Computer Vision Toolbox) | Clean up resources after execution |
Create Package Folder for Automation Class
Create a +vision/+labeler/ folder within a folder that is on
the MATLAB path. For example, if the folder /local/MyProject
is on the MATLAB path, then create the +vision/+labeler/ folder
hierarchy as
follows:
projectFolder = fullfile('local','MyProject');
automationFolder = fullfile('+vision','+labeler');
mkdir(projectFolder,automationFolder)
/local/MyProject/+vision/+labeler.Save Automation Class to Package Folder
To use your custom algorithm from within the labeling app, save the file to the
+vision/+labeler folder that you created. Make sure that this
folder is on the MATLAB search path. To add a folder to the path, use the addpath function.
Refresh Algorithm List in Labeling App
To start using your custom algorithm, refresh the algorithm list so that the algorithm displays in the app. On the app toolstrip, select Select Algorithm > Refresh list.
Import Existing Automation Algorithm in Labeler App
To import an existing custom algorithm into a labeling app, on the app toolstrip, select Select Algorithm > Add Algorithm > Import Algorithm. Refresh the list to make it available.
Custom Automation Algorithm Execution in Labeler App
When you run an automation session in a labeling app, the properties and methods in your automation algorithm class control the behavior of the app.
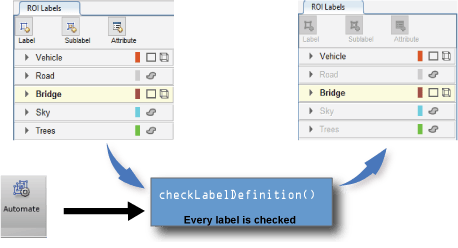
Check Label Definitions
When you click Automate, the app checks each label definition
in the ROI Labels and Scene Labels panes
by using the checkLabelDefinition (Computer Vision Toolbox) method defined
in your custom algorithm. Label definitions that return true are
retained for automation. Label definitions that return false are
disabled and not included. Use this method to choose a subset of label definitions
that are valid for your custom algorithm. For example, if your custom algorithm is a
semantic segmentation algorithm, use this method to return false
for label definitions that are not of type PixelLabel.
Control Settings
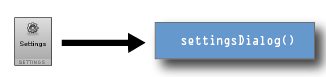
After you select the algorithm, click Automate to start an
automation session. Then, click Settings, which enables you to
modify custom app settings. To control the Settings options,
use the settingsDialog (Computer Vision Toolbox) method.
Control Algorithm Execution
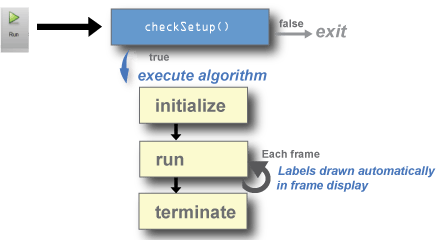
When you open an automation algorithm session in the app and then click
Run, the app calls the checkSetup method
to check if it is ready for execution. If the method returns
false, the app does not execute the automation algorithm. If
the method returns true, the app calls the
initialize method and then the run method on
every frame selected for automation. Then, at the end of the automation run, the app
calls the terminate method.
The diagram shows this flow of execution for the labeling apps.
Use the
checkSetup(Computer Vision Toolbox) method to check whether all conditions needed for your custom algorithm are set up correctly. For example, before running the algorithm, check that the scene contains at least one ROI label.Use the
initialize(Computer Vision Toolbox) method to initialize the state for your custom algorithm by using the frame.Use the
run(Computer Vision Toolbox) method to implement the core of the algorithm that computes and returns labels for each frame.Use the
terminate(Computer Vision Toolbox) method to clean up or terminate the state of the automation algorithm after the algorithm runs.
See Also
Apps
Objects
vision.labeler.AutomationAlgorithm(Computer Vision Toolbox) |vision.labeler.mixin.Temporal(Computer Vision Toolbox)
Topics
- Get Started with Multi-Sensor Labeler
- Automate Multi-Sensor Ground Truth Labeling Using Moondream Vision-Language Model
- Automate Vehicle Labels and Distance Attributes Using YOLOv2 in Multi-Sensor Labeler
- Automate Ground Truth Labeling of Lane Boundaries
- Automate Ground Truth Labeling for Point Cloud Using Pretrained Deep Learning Model
- Automate Point Cloud Labeling Using SNAP Model

