Set Up UR Series Cobot for RTDE
Setting up the Universal Robots cobot for exchanging data over RTDE involves configuring few parameters on the Teach Pendant and also transferring the URServer script to the Teach Pendant.
Configure Hardware Connection and Network Parameters
You need to perform network configuration for both cobot and MATLAB® PC.
To configure network configuration for the cobot:
Press the
 button to power on the Teach Pendant.
Power on the UR Series cobot.
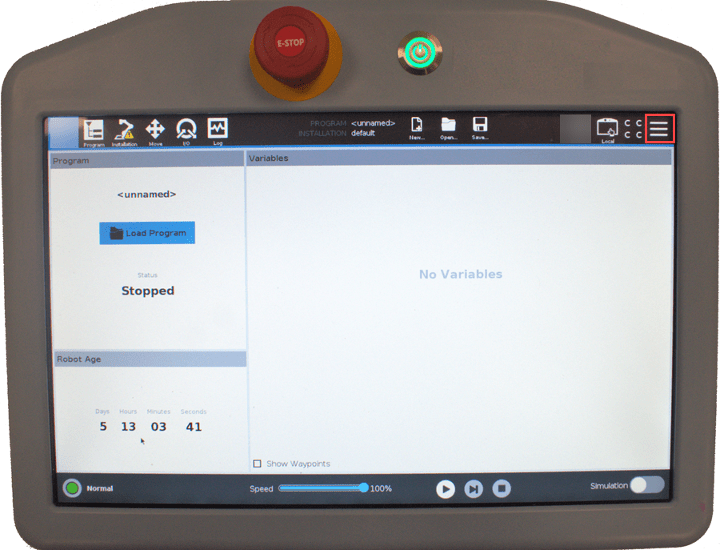
In the graphical interface of the Teach Pendant, click the toggle menu at the top right corner.

From the list of options, select Settings to enter the robot's setup.

Select System and then select Network.

In the Network tab, select Static Address and configure the parameters as shown here, and click Apply.

Configure Network Parameters of the Host Computer
After you complete these steps to configure the static IP address on the Teach Pendant, follow the instructions in Set Up Network Adapter and Basic Network Ping to set up the network adapter in the host computer running MATLAB, and test the network ping.
Enable Services
If you are using PolyScope 5.10 or later version, you need to enable the security services related to RTDE. To do this:
In the PolyScope interface, go to the hamburger menu, and select Settings.
Go to Security > Services.
Unlock the menu using the admin password.
Enable the Dashboard Server, Primary Client Interface, and Real-Time Data Exchange (RTDE) interfaces.
Lock the menu and click Exit.
For additional information, refer to the Universal Robots documentation - Robot setup.
Load and Play UR Program on Hardware
Open the MATLAB terminal and access the path where
URServerScript.scriptfile is available by using this command.installationFilePath = fullfile(codertarget.urseries.internal.getSpPkgRootDir,'resources') cd(installationFilePath)By default, the script is configured to disable the gripper actuation and release for Robotiq grippers. If you are using the hardware (URSeries cobot) with a gripper, you must enable the gripper. To do this, open
URServerScript.scriptand uncomment the relevant lines of code.If you are using Robotiq Vacuum Gripper:
Uncomment the below line that appears under the code section
# Task4: Function to activate gripper:# rq_vacuum_grip(False, 60, 40, 3000, True, "2")Uncomment the below line that appears under the code section
# Task5: Function to release gripper:# rq_vacuum_release(False,5,True,"2")
If you are using Robotiq 2-Finger Adaptive Robot Gripper:
Uncomment the below two lines that appear under the code section
# Task4: Function to activate gripper:# rq_activate_and_wait()# rq_close()Uncomment the below two lines that appear under the code section
# Task5: Function to release gripper:# rq_activate_and_wait()# rq_open()
Tip
To utilize the gripper feature in the robot program, you must also download the URCap for gripper. For more information, see Vacuum Grippers - Robotiq or 2F-85 and 2F-140 Grippers - Robotiq and download the associated URCap file (available under Download Files > Universal Robots > Gripper Software).
Copy the
URServerScript.scriptfile from Current Folder browser in MATLAB to a USB and transfer it to the Teach Pendant.
In the Teach Pendant interface:
Create a new program.
From the left navigation menu, select Advanced > Script.
Click Robot Program > Script, and select
Filefrom the drop-down list.The Script Code pane now displays the Edit button that you can use to select the file.
Click Edit > Open, and select the
URServerScript.scriptfile that you copied. Click Exit.Save the program.
Setting Up Connectivity Medium as RTDE and Validating Connection to URSeries Cobot
The final step in preparing the URSeries cobot involves setting
RTDE as the connectivity medium and verifying a test connection
between MATLAB and the cobot using the Hardware Setup process.
Navigate to the Select connectivity medium window in the Hardware Setup wizard, select RTDE, and click Next.
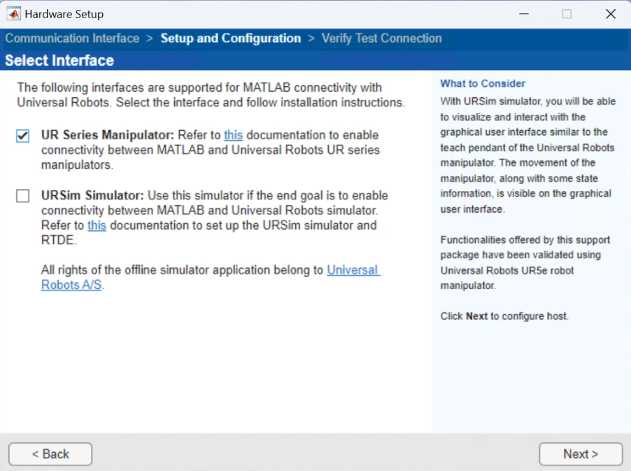
In the Select Interface window, select UR Series Manipulator, and click Next.

In the Joint Angle Acquisition window, enter the UR Controller IP address in the Robot Address field, and click Get Joint Angles. MATLAB sends a command and verifies the communication with the UR Controller. If the communication is successful, the message -
Joint
                        angles acquired
is displayed. In that case, click Next and follow the remaining steps to complete the Hardware Setup process.
Tip
The UR Controller IP address of the UR Series cobot on Linux® is the same as the static IP address assigned to the cobot. For more information, see Step 6 in the Configure Hardware Connection and Network Parameters section.