Implement Multicore Programming with CPU Core Affinity for Raspberry Pi
This example shows how to use explicit partitioning for Simulink® Support Package for Raspberry Pi® Hardware models to create atomic subsystems and concurrently execute tasks on a multicore Raspberry Pi processor.
Introduction
Multicore programming helps you improve the performance of a deployed application, allows you to simulate under typical computational loads, and try multiple configurations of partitioning and mapping the application.
In this example, a Raspberry Pi Simulink model is configured for multicore execution. This example also shows you how to execute the same Simulink model on a single core Raspberry Pi processor and compare the results of single core and multicore execution.
Prerequisites
We recommended that you complete the Get Started with Simulink Support Package for Raspberry Pi Hardware example.
Raspberry Pi Multicore Project Folder
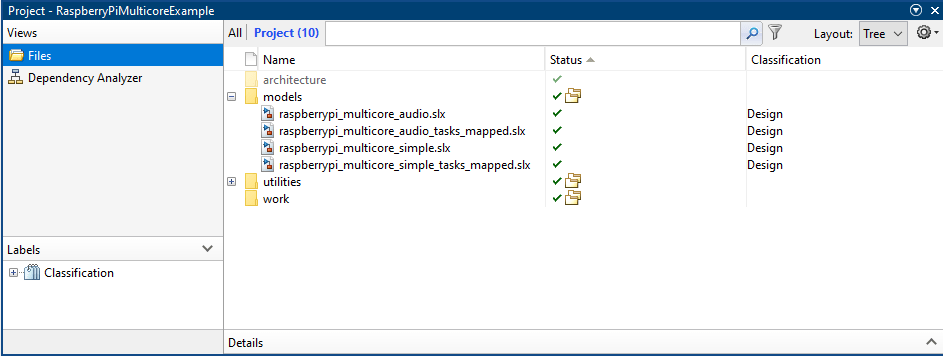
This support package has a preconfigured multicore project.
1. To open this folder, select Simulink Start Page > Simulink Support Package for Raspberry Pi Hardware > Raspberry Pi Multicore.

2. In the Create Project dialog box, enter the project name and select the folder location to save the project.
3. Click OK.
4. A warning message, The project folder does not exist. Do you want to create it?, is displayed. Click Yes. The project folder opens.
The models folder contains two Raspberry Pi Simulink models.
Raspberry Pi Multicore Audio
Raspberry Pi Multicore Simple

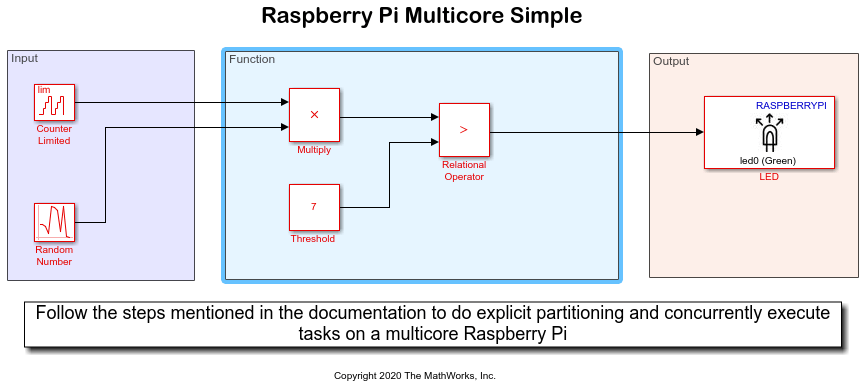
This example showcases the Raspberry Pi multicore execution of concurrent tasks for the raspberrypi_multicore_simple Simulink model.
To open the model, double-click the raspberrypi_multicore_simple model.

Raspberry Pi Multicore Simple Model
This Simulink model has three areas, Input, Function, and Output.
1. Input Area
This area consists of a Counter, whose upper limit is 10, and a Random Number Generator. The Sample time parameter on the Counter and Random Number Generator blocks is set to 0.5 seconds.
2. Function Area
The Counter and Random Number Generator outputs are multiplied, and the resulted output is compared with the value provided in the Threshold block. The Threshold value is set to 7.
3. Output Area
If this resulted output is greater than the value set in the Threshold block, the configured LED on the Raspberry Pi board turns ON.
Run Model for Single Core Execution on Raspberry Pi CPU
1. Open the raspberrypi_multicore_simple Simulink model.
2. On the Hardware tab of the Simulink model, in the Mode section, select Run on board and then click Build, Deploy & Start.
3. To open an SSH connection to Raspberry Pi, execute this command at the MATLAB® Command Window:
r=raspberrypi('Raspberry Pi IP address','Raspberry Pi username','Raspberry Pi password');
r.openShell
4. To view the load on the Raspberry Pi core, execute this command at the Raspberry Pi Shell:
htop
Observe that only one CPU is utilized to execute the model and the average core load is high.
Configure Simulink Model for Concurrent Execution and Specify Target Architecture
You can configure the Simulink model to take advantage of concurrent execution. After configuring the model for concurrent execution, you can choose the architecture to deploy to your model.
Open the raspberrypi_multicore_simple Simulink model.
On the Modeling tab, click Model Settings.
Select Hardware Implementation > Hardware board and select
Raspberry Pidevice.Select Code Generation > Interface > Advanced Parameters and clear the
MAT-file loggingoption.Select Solver, then in the Solver Selection section, select
Fixed-stepfor Type andauto (Automatic solver selection)for Solver.Under Solver details, select Allow tasks to execute concurrently on target. When you select this option, Simulink allows each rate in the referenced model to execute as an independent concurrent task on the Raspberry Pi processor.
Click Configure Tasks.
In the Concurrent Execution dialog box, under the Concurrency modeling options section, select Enable explicit model partitioning for concurrent behavior.
Click Select to select the Target architecture.
In the Target architecture dialog box, select
MulticoreCustomAPI-Multicore with core affinity.Clear the Preserve compatible properties option to reset existing target property settings to their default values. Alternatively, select Preserve compatible properties option to preserve existing target property settings.
Click OK.
The Concurrent Execution dialog box updates to contain Code Generation properties for the tasks as shown.
Partition Simulink Model Using Explicit Partitioning
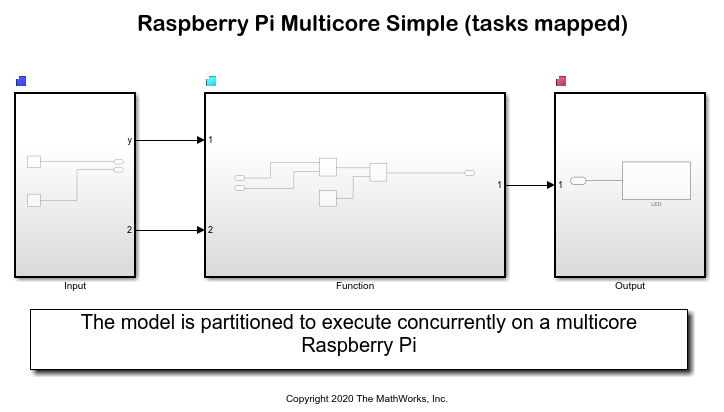
After configuring the model for concurrent execution, you can add individual tasks and map the partitions using explicit partitioning. This enables you to execute different parts of your model to different parts of your architecture. For more information, see Implicit and Explicit Partitioning of Models
Convert Model Block into Atomic Subsystem
Ensure to convert the blocks at the root level of the model into atomic subsystem blocks.
Open the raspberrypi_multicore_simple Simulink model.
Select the Input area of the model.
On the Modeling tab, under the Component section, select Atomic Subsystem from the Create Component from Selection section.
Repeat steps 2-3 for the Function and Output areas of the model.
Add Periodic Triggers and Tasks
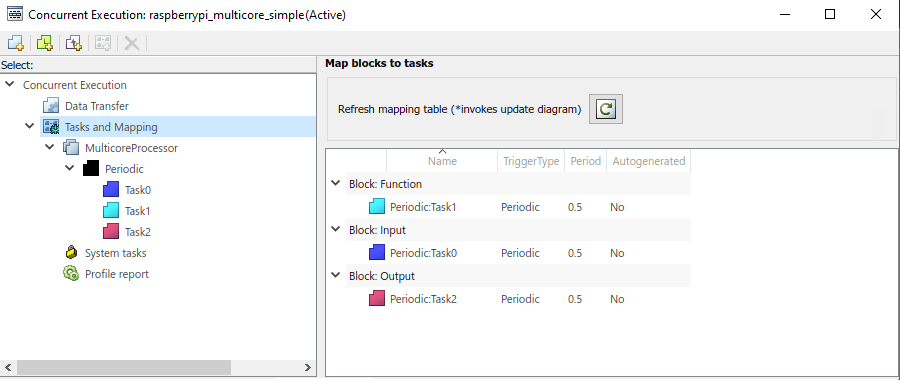
Periodic triggers represent multiple periodic interrupt sources such as multiple timers. The periodicity of the trigger is either the base rate of the tasks that the trigger schedules or the period of the trigger. This model uses only one periodic trigger. Three tasks are created under the periodic node for the Input, Function, and Output areas.
In the Concurrent Execution dialog box, right-click the Periodic node and select Add task. A task node appears in the Configuration Execution hierarchy.
Select the task node and enter a name and period for the task, then click Apply. In this example, the period of the task is the same as the sampling time of the blocks,
0.5seconds.Optionally, specify a color for the task. The color illustrates the block-to-task mapping. If you do not assign a color, Simulink chooses a default color. If you enable sample time colors for your model, the software honors the setting.
Repeat steps 1-3 to create a periodic node for each area of the model.
Click Apply as necessary.

Map Blocks to Tasks, Triggers, and Nodes
After you create the tasks and triggers, you can explicitly assign partitions to these execution elements.
In the Concurrent Execution dialog box, click Tasks and Mapping node. The Tasks and Mapping pane appears. The atomic subsystem blocks appear in the table with a select-task entry under each of the blocks.
To assign a task for the Input atomic subsystem, click the select task box in the Name column and select
Periodic:Task1from the drop-down list. The block-to-task mapping symbol appears on the top-left corner of the model block.Repeat steps 1-2 for the Function and Output atomic subsystems.

Run Model for Multicore Execution on Raspberry Pi CPU
Note: Multicore execution of a Simulink model on the Raspberry Pi CPU is not supported in the external mode (Monitor & Tune).
1. On the Hardware tab of the updated raspberrypi_multicore_simple Simulink model, in the Mode section, select Run on board and then click Build, Deploy & Start.
2. To open an SSH connection to Raspberry Pi, execute this command at the MATLAB Command Window:
r=raspberrypi('Raspberry Pi IP address','Raspberry Pi username','Raspberry Pi password');
r.openShell
3. To view the load on the Raspberry Pi core, execute this command at the Raspberry Pi Shell:
htop
Observe that three CPU cores are utilized to execute the model and that the average core load is low as compared to the single core execution.
Note: In the models folder, the raspberrypi_multicore_simple_tasks_mapped Simulink model is provided for your reference. The model has been configured for concurrent execution and has been partitioned explicitly. You can deploy this Simulink model on the Raspberry Pi board and observe similar results in the Raspberry Pi Shell window.
Other Things to Try
Use the Raspberry Pi Resource Monitor App and observe the core occupancy results in the Shell terminal. Refer to Working with Raspberry Pi Terminal section.
Implement the raspberrypi_multicore_audio Simulink model located in the models folder.
Implement multicore execution for any Raspberry Pi Simulink model.