Create an App to Measure Images Using Edge‑Snapping Metrology
R2026bThis example shows how to build an app to interactively measure images with edge snapping measurement functions using App Designer. Using the EdgeSnappingMeasurementApp app, users can draw multiple measurements of different types directly on the image and export the measurements to the workspace. The app supports these measurement functions:
uicaliper— Measures distance between two points and reports inter‑edge and intra‑edge distances where edges are detected along the caliper profile. In theEdgeSnappingMeasurementAppapp, the start and end points can snap to edges near the drawing area to provide a more accurate measurement.uitsquare— Measures one or more perpendicular distances from a reference T‑square edge. In theEdgeSnappingMeasurementAppapp, the T-square edge and measurement lines can snap to edges near the drawing area to provide a more accurate measurement.uifitangle— Measures the angle formed by three points. In theEdgeSnappingMeasurementAppapp, the angle edges and points can snap to edges near the drawing area to provide a more accurate measurement.uifitcircle— Measures circle properties such as radius, area, and circumference. In theEdgeSnappingMeasurementAppapp, the circle annotation input can snap to circles near the drawing area to provide a more accurate measurement.
Open App Designer
App Designer is an interactive development environment for designing apps and custom UI components and programming their behavior.
To build the app from scratch, open App Designer using this command. Alternatively, you can open App Designer by selecting the Design App option on the Apps tab of the MATLAB® toolstrip.
appdesigner
The EdgeSnappingMeasurementApp app is also attached to this example as a supporting file. For information on running the app, see the Measure an Image Using App section.
You can also open this example from the App Designer home page by clicking Show examples in the Apps section of the home page and selecting Measure with Edge Snapping Tool from the list of examples.
You can customize the code of the app in the attached supporting files. For information on customizing the app, see the Customize the App section.
App Layout Design
The EdgeSnappingMeasurementApp app has two main regions: a toolstrip and a working area.
The toolstrip contains these sections:
Import — Consists of UI components used to import an image from a file or the workspace.
Controls — Consists of UI components used to specify pixel extent, enable edge snapping, start a new measurement, or delete existing measurements.
Export — Consists of UI components used to export the measurements to the workspace.
The working area of the app contains these sections:
Viewer — Displays the imported image. The app displays the image using the
imageshowfunction. The handle of the displayed image is anImageobject. AViewerobject is the parent of theImageobject. For more information about theImageobject, see Image Properties. For more information about theViewerobject, see Viewer Properties.Measurement Parameters and History — Contains tabs for each type of measurement, and displays a tabular list of measurements of the corresponding type in each tab. Each row contains the parameters of a measurement and a check box to select the measurement for deletion.
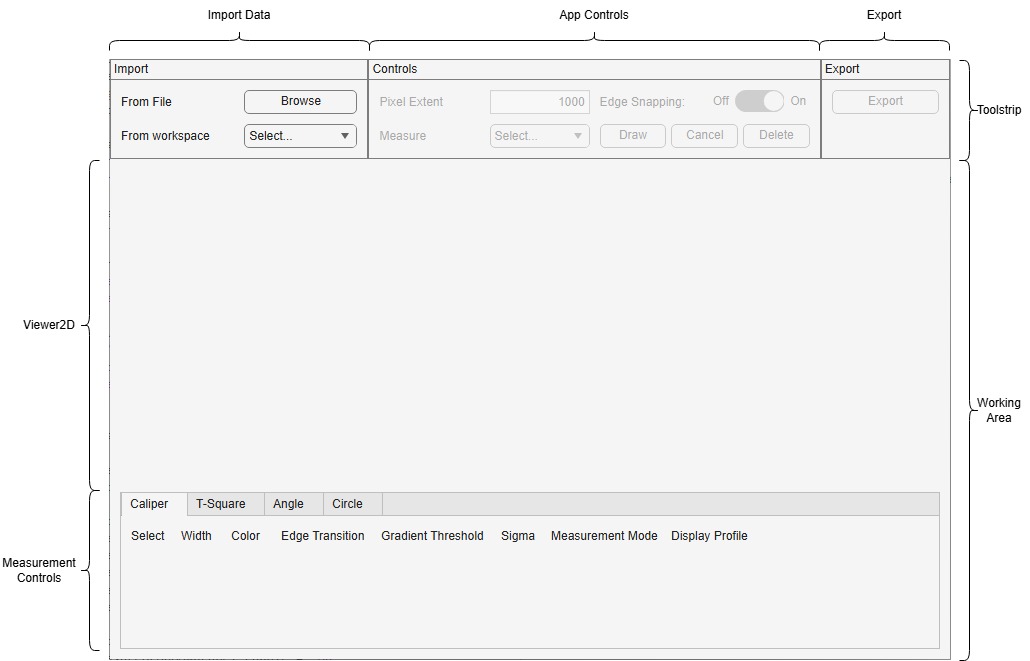
The app uses a grid layout structure to create the defined layout.
Main App figure
Main app grid layout
Toolstrip grid layout
Toolstrip elements like import, controls, export
Working area grid layout
Image panel containing
ImageobjectMeasurement parameters and history
Tabs for each type of measurement containing tabular list of measurements of that type
For more information on using grid layout with App Designer, see Use Grid Layout Managers in App Designer.
Define App Properties
The app stores the input image and measurements in these properties.
Viewer—Viewerobject used to display the image.ImageHandle—Imageobject created byimageshow, used to display and update the loaded image.CaliperMeasurementControlRows— Structure array to store the properties of a caliper measurement object. Users can change the properties of a caliper measurement even after drawing it.TSquareMeasurementControlRows— Structure array to store the properties of a T-square measurement object. Users can change only the color of the T-square measurement after drawing it.AngleMeasurementControlRows— Structure array to store the properties of an angle measurement object. Users can change only the color of the angle measurement after drawing it.CircleMeasurementControlRows— Structure array to store the properties of a circle measurement object. Users can change only the color of the circle measurement after drawing it.
Define App Methods
The app uses methods to import and visualize data, process user input, export the final results, and control the app state. The app also uses some helper functions to improve code readability and code reusability. These are some of the important app methods.
Reset App on New Data Load
When the user loads a new image into the app, the app clears the existing image data, displays the loaded image, and clears all measurement history. The app resets UI elements to their default states and enables the drop-down used to select a measurement type. The resetAppOnNewDataLoad method defines this behavior.
function resetAppOnNewDataLoad(app,imageData)
    % Function to reset app when new data is loaded

    % Set the newly loaded image data and reset viewer2d.
    app.ImageHandle.Data = imageData;
    app.Viewer.Interactions = ["pan","zoom"];
    micrometersPerPixel = app.PixelExtentEditField.Value;
    unitSpec = imref2d(size(imageData),micrometersPerPixel,micrometersPerPixel);
    app.ImageHandle.Transformation = unitSpec;

    % Reset UI elements to default state
    app.MeasureDropDownLabel.Enable = "on";
    app.MeasureDropDown.Enable = "on";
    app.EdgeSnappingSwitch.Enable = "on";
    app.PixelExtentEditFieldLabel.Enable = "on";
    app.PixelExtentEditField.Enable = "on";
    app.ExportButton.Enable = "off";
    app.DeleteButton.Enable = "off";

    % Clear existing caliper measurements
    for idx = 1:length(app.CaliperMeasurementControlRows)
        caliperMeasurementControlRow = app.CaliperMeasurementControlRows(idx);
        fields = fieldnames(caliperMeasurementControlRow);
        for j = 1:numel(fields)
            if ~ismember(fields{j},"ID")
                delete(caliperMeasurementControlRow.(fields{j}));
            end
        end
    end
    app.CaliperMeasurementControlRows(1:end) = [];

    % Clear existing T-square measurements
    for idx = 1:length(app.TSquareMeasurementControlRows)
        tsquareMeasurementControlRow = app.TSquareMeasurementControlRows(idx);
        fields = fieldnames(tsquareMeasurementControlRow);
        for j = 1:numel(fields)
            if ~ismember(fields{j},"ID")
                delete(tsquareMeasurementControlRow.(fields{j}));
            end
        end
    end
    app.TSquareMeasurementControlRows(1:end) = [];

    % Clear existing angle measurements
    for idx = 1:length(app.AngleMeasurementControlRows)
        angleMeasurementControlRow = app.AngleMeasurementControlRows(idx);
        fields = fieldnames(angleMeasurementControlRow);
        for j = 1:numel(fields)
            if ~ismember(fields{j},"ID")
                delete(angleMeasurementControlRow.(fields{j}));
            end
        end
    end
    app.AngleMeasurementControlRows(1:end) = [];

    % Clear existing circle measurements
    for idx = 1:length(app.CircleMeasurementControlRows)
        circleMeasurementControlRow = app.CircleMeasurementControlRows(idx);
        fields = fieldnames(circleMeasurementControlRow);
        for j = 1:numel(fields)
            if ~ismember(fields{j},"ID")
                delete(circleMeasurementControlRow.(fields{j}));
            end
        end
    end
    app.CircleMeasurementControlRows(1:end) = [];
end
Set Pixel Extent
To improve measurement accuracy, the app enables you to specify a Pixel Extent value, in micrometers per pixel, which it uses to create a 2‑D spatial referencing object with imref2d. The app assigns that object to the Transformation property of the Image object so that measurements use the specified world scale. The PixelExtentEditFieldValueChanged method defines this behavior.
function PixelExtentEditFieldValueChanged(app,event)
    % Callback function to update pixel extent based on user input
    micrometersPerPixel = app.PixelExtentEditField.Value;
    unitSpec = imref2d(size(app.ImageHandle.Data),micrometersPerPixel,micrometersPerPixel);
    app.ImageHandle.Transformation = unitSpec;
end
Add New Measurement
When the user selects a new measurement from the Measure drop-down in the Controls section of the app toolstrip, the app switches to the corresponding tab in the Measurement Parameters and History section. The app adds a new row of UI controls at the top of that tab for parameter input. Each row starts with a check box, used later for selecting rows to delete, followed by controls for tool parameters such as width, snap neighborhood, and edge map. The MeasureDropDownValueChanged method defines this behavior.
% Value changed function: MeasureDropDown
function MeasureDropDownValueChanged(app,event)
    % Callback function for processing user
    % measurement selection

    % Once the first measurement is added, pixel extent can no
    % longer be modified.
    app.PixelExtentEditField.Enable = "off";
    app.PixelExtentEditFieldLabel.Enable = "off";

    value = app.MeasureDropDown.Value;
    % If user did not select one of these measurements, then
    % do nothing
    if ~ismember(value,["Caliper","T-Square","Angle","Circle"])
        return;
    end
    % Lock all existing control inputs
    app.disableForControlInput();
    % Switch to the selected measurement tab and create a new row
    % for input
    switch value
        case "Caliper"
            app.TabGroup.SelectedTab = app.Caliper;
            app.addNewCaliperMeasurementControlRow();
        case "T-Square"
            app.TabGroup.SelectedTab = app.T_Square;
            app.addNewTSquareMeasurementControlRow();
        case "Angle"
            app.TabGroup.SelectedTab = app.Angle;
            app.addNewAngleMeasurementControlRow();
        case "Circle"
            app.TabGroup.SelectedTab = app.Circle;
            app.addNewCircleMeasurementControlRow();
    end
end
Create Measurement Annotation in Draw Mode
After the user selects a new measurement and specifies the measurement parameters, they can select the Draw option in the Controls section of the app toolstrip to enter the drawing mode of the app. The app locks most app controls while in drawing mode to ensure that the app state does not change in the middle of an interaction. The app reads the parameter values from the latest row added to the corresponding measurement tab and calls the appropriate interactive metrology function. Once the user has finished drawing, the app re‑enables the parameter fields that are editable after drawing. For example, the Color parameter is editable after drawing any measurement annotation, but the Snap parameter is not editable for caliper annotations. The DrawButtonPushed method defines this behavior.
% Button pushed function: DrawButton
function DrawButtonPushed(app,event)
    % Callback function to process the current measurement inputs
    % and start drawing

    selectedMeasurementTool = app.MeasureDropDown.Value;

    % Reset the selection back to default
    app.MeasureDropDown.Value = app.MeasureDropDown.Items(1);
    % Lock draw button until user re-selects a measurement
    app.DrawButton.Enable = "off";
    app.CancelButton.Enable = "off";

    % Enable drawing of the selected measurement with control inputs
    % provided by user. Also lock the last created row of controls
    switch selectedMeasurementTool
        case "Caliper"
            parameters = app.CaliperMeasurementControlRows(end);

            % Lock last caliper input
            fields = fieldnames(parameters);
            for j = 1:numel(fields)
                if ~ismember(fields{j},["ID","Annotation"])
                    parameters.(fields{j}).Enable = false;
                end
            end

            % Switch to drawing caliper measurement
            hcaliper = uicaliper(app.ImageHandle, ...
                Width=parameters.Width.Value, ...
                Color=parameters.Color.Value, ...
                EdgeTransition=parameters.EdgeTransition.Value, ...
                GradientThreshold=parameters.GradientThreshold.Value, ...
                Sigma=parameters.SigmaEditField.Value, ...
                MeasurementMode=parameters.MeasurementMode.Value, ...
                DisplayProfile=parameters.DisplayProfile.Value);
            app.CaliperMeasurementControlRows(end).Annotation = hcaliper;
        case "T-Square"
            parameters = app.TSquareMeasurementControlRows(end);

            % Lock last T-square input
            fields = fieldnames(parameters);
            for j = 1:numel(fields)
                if ~ismember(fields{j},["ID","Annotation"])
                    parameters.(fields{j}).Enable = false;
                end
            end

            % Switch to drawing t-square measurement
            htsquare = uitsquare(app.ImageHandle, ...
                SnapNeighborhood=parameters.SnapNeighborhood.Value, ...
                Color=parameters.Color.Value, ...
                PointSnapMethod=parameters.PointSnapMethod.Value, ...
                LineSnapMethod=parameters.LineSnapMethod.Value, ...
                EdgeMap=string(parameters.EdgeMap.Value));
            app.TSquareMeasurementControlRows(end).Annotation = htsquare;
        case "Angle"
            parameters = app.AngleMeasurementControlRows(end);

            % Lock last angle input
            fields = fieldnames(parameters);
            for j = 1:numel(fields)
                if ~ismember(fields{j},["ID","Annotation"])
                    parameters.(fields{j}).Enable = false;
                end
            end

            % Switch to drawing angle measurement
            hangle = uifitangle(app.ImageHandle, ...
                Color=parameters.Color.Value, ...
                Snap=parameters.Snap.Value, ...
                SnapNeighborhood=parameters.SnapNeighborhood.Value, ...
                LineSnapMethod=parameters.LineSnapMethod.Value, ...
                PointSnapMethod=parameters.PointSnapMethod.Value, ...
                EdgeMap=string(parameters.EdgeMap.Value));
            app.AngleMeasurementControlRows(end).Annotation = hangle;
        case "Circle"
            parameters = app.CircleMeasurementControlRows(end);

            % If angle range is not strictly increasing, show error
            % and revert back to input mode.
            if parameters.AngleRangeMin.Value >= parameters.AngleRangeMax.Value
                uialert(app.EdgeSnappingMeasurementToolFigure, ...
                    "Expected angle range to be strictly increasing.", ...
                    "Input error");
                app.MeasureDropDown.Value = "Circle";
                app.DrawButton.Enable = "on";
                app.CancelButton.Enable = "on";
                return;
            end

            % Lock last circle input
            fields = fieldnames(parameters);
            for j = 1:numel(fields)
                if ~ismember(fields{j},["ID","Annotation"])
                    parameters.(fields{j}).Enable = false;
                end
            end

            % Switch to drawing circle measurement
            hcircle = uifitcircle(app.ImageHandle, ...
                Snap=parameters.Snap.Value, ...
                Color=parameters.Color.Value, ...
                SnapNeighborhood=parameters.SnapNeighborhood.Value, ...
                RansacIterations=parameters.RansacIterations.Value, ...
                RansacInlierDistance=parameters.RansacInlierDistance.Value, ...
                AngleRange=[parameters.AngleRangeMin.Value parameters.AngleRangeMax.Value], ...
                EdgeMap=string(parameters.EdgeMap.Value));
            app.CircleMeasurementControlRows(end).Annotation = hcircle;
    end
    % Once drawing is completed, re-enable all editable inputs
    app.enableAfterControlInput();
end
Change Parameters After Measurement
Users can change some measurement parameters even after drawing. The app links each row of the measurement history to its corresponding measurement annotation using a universally unique identifier (UUID). The app matches any changes in the parameters to the measurement annotation using this UUID. The measurementControlValueChanged method defines this behavior.
function measurementControlValueChanged(app,evt,measurementType,propertyName,id)
    % Callback function for processing user inputs after drawing is
    % completed. When user updates any of the editable properties of
    % any measurement, this function passes them to the
    % measurement handle
    switch measurementType
        case "Caliper"
            index = ismember([app.CaliperMeasurementControlRows.ID],id);
            if ~isempty(app.CaliperMeasurementControlRows(index).Annotation)
                app.CaliperMeasurementControlRows(index).Annotation.(propertyName) = evt.Value;
            end
        case "T-Square"
            index = ismember([app.TSquareMeasurementControlRows.ID],id);
            if ~isempty(app.TSquareMeasurementControlRows(index).Annotation)
                app.TSquareMeasurementControlRows(index).Annotation.(propertyName) = evt.Value;
            end
        case "Angle"
            index = ismember([app.AngleMeasurementControlRows.ID],id);
            if ~isempty(app.AngleMeasurementControlRows(index).Annotation)
                app.AngleMeasurementControlRows(index).Annotation.(propertyName) = evt.Value;
            end
        case "Circle"
            index = ismember([app.CircleMeasurementControlRows.ID],id);
            if ~isempty(app.CircleMeasurementControlRows(index).Annotation)
                app.CircleMeasurementControlRows(index).Annotation.(propertyName) = evt.Value;
            end
    end
end
Delete Multiple Measurements
Users can delete multiple measurements simultaneously by selecting one or more rows in the measurement history using the corresponding check boxes in the first column and then selecting Delete in the Controls section of the app toolstrip. The app enables the Delete button only when at least one measurement has been selected. The DeleteButtonPushed method calls the deletion functions specific to each type of measurement. Each deletion function uses the index and UUIDs of the selected measurements in the corresponding tab to delete the measurement annotation from the Viewer section, delete the measurement row from the measurement history, and move the remaining rows upward. For example, the deleteSelectedCaliper function deletes all selected measurements in the Caliper tab of the measurement history.
% Button pushed function: DeleteButton
function DeleteButtonPushed(app,event)
    % Callback function to delete selected rows of measurements
    app.deleteSelectedCaliper();
    app.deleteSelectedTsquare();
    app.deleteSelectedAngle();
    app.deleteSelectedCircle();

    app.DeleteButton.Enable = "off";

    % If all measurements are deleted, lock the export button
    if isempty(app.CaliperMeasurementControlRows) && isempty(app.TSquareMeasurementControlRows) && isempty(app.AngleMeasurementControlRows) && isempty(app.CircleMeasurementControlRows)
        app.ExportButton.Enable = "off";
    end
end

function deleteSelectedCaliper(app)
    % Helper function to delete all selected rows of caliper
    % measurements

    % Find the selected rows of caliper measurements
    deletedIndex = false(1,length(app.CaliperMeasurementControlRows));
    for idx = 1:length(app.CaliperMeasurementControlRows)
        caliperMeasurementControlRow = app.CaliperMeasurementControlRows(idx);
        if caliperMeasurementControlRow.Select.Value
            deletedIndex(idx) = true;
            fields = fieldnames(caliperMeasurementControlRow);
            % Delete the UI elements of the selected rows
            for j = 1:numel(fields)
                if ~ismember(fields{j},"ID")
                    delete(caliperMeasurementControlRow.(fields{j}));
                end
            end
        end
    end
    % If any row of caliper measurement was selected, remove it from
    % CaliperMeasurementControlRows and move the remaining rows up
    % to use the empty fields
    if any(deletedIndex)
        app.CaliperMeasurementControlRows(deletedIndex) = [];
        for idx = 1:length(app.CaliperMeasurementControlRows)
            caliperMeasurementControlRow = app.CaliperMeasurementControlRows(idx);
            caliperMeasurementControlRow.Select.Parent.Layout.Row = idx + 1;
        end
    end
end
Export All Measurements
When the user selects the Export option, the app collects the measurement results in the current state into a single structure named Measurements and exports it to the base workspace. The structure contains one array for each measurement type. The app exports these measurement details for each type of measurement.
Caliper —
InterEdgeDistance,IntraEdgeDistance,Distance, andGradientValuehttps://mathworks-my.sharepoint.com/personal/prachik_mathworks_com/Documents/Microsoft%20Copilot%20Chat%20Files/EdgeSnappingMeasurementApp.pdfT‑Square —
Distance,Position,ReferenceLine, andMeasurementPointsAngle —
PositionandThetaCircle —
Center,Radius,Area, andCircumference
The app then shows a success dialog after exporting. The ExportButtonPushed method defines this behavior.
% Button pushed function: ExportButton
function ExportButtonPushed(app,event)
    % Callback function to gather all measurement results and write
    % it to workspace
    Measurements = struct();

    % Gather InterEdgeDistance, IntraEdgeDistance, Distance and
    % GradientValue fields of caliper measurements to write in export
    caliperAnnotations = struct("InterEdgeDistance",{},"IntraEdgeDistance",{},"Distance",{},"GradientValue",{});
    for idx = 1:length(app.CaliperMeasurementControlRows)
        caliperMeasurementControlRow = app.CaliperMeasurementControlRows(idx);

        caliperResult.InterEdgeDistance = caliperMeasurementControlRow.Annotation.InterEdgeDistance;
        caliperResult.IntraEdgeDistance = caliperMeasurementControlRow.Annotation.IntraEdgeDistance;
        caliperResult.Distance = caliperMeasurementControlRow.Annotation.Distance;
        caliperResult.GradientValue = caliperMeasurementControlRow.Annotation.GradientValue;

        caliperAnnotations(idx) = caliperResult;
    end
    Measurements.CaliperAnnotation = caliperAnnotations;

    % Gather Distance, Position, ReferenceLine and
    % MeasurementPoints fields of T-square measurements to write in export
    tsquareAnnotations = struct("Distance",{},"Position",{},"ReferenceLine",{},"MeasurementPoints",{});
    for idx = 1:length(app.TSquareMeasurementControlRows)
        tSquareMeasurementControlRow = app.TSquareMeasurementControlRows(idx);

        tsquareResult.Distance = tSquareMeasurementControlRow.Annotation.Distance;
        tsquareResult.Position = tSquareMeasurementControlRow.Annotation.Position;
        tsquareResult.ReferenceLine = tSquareMeasurementControlRow.Annotation.ReferenceLine;
        tsquareResult.MeasurementPoints = tSquareMeasurementControlRow.Annotation.MeasurementPoints;

        tsquareAnnotations(idx) = tsquareResult;
    end
    Measurements.TSquareAnnotation = tsquareAnnotations;

    % Gather Position and Theta fields of angle measurements to
    % write in export
    angleAnnotations = struct("Position",{},"Theta",{});
    for idx = 1:length(app.AngleMeasurementControlRows)
        angleMeasurementControlRow = app.AngleMeasurementControlRows(idx);

        angleResult.Position = angleMeasurementControlRow.Annotation.Position;
        angleResult.Theta = angleMeasurementControlRow.Annotation.Theta;

        angleAnnotations(idx) = angleResult;
    end
    Measurements.AngleAnnotation = angleAnnotations;

    % Gather Center, Radius, Area and Circumference fields of circle
    % measurements to write in export
    circleAnnotations = struct("Center",{},"Radius",{},"Area",{},"Circumference",{});
    for idx = 1:length(app.CircleMeasurementControlRows)
        circleMeasurementControlRow = app.CircleMeasurementControlRows(idx);

        circleResult.Center = circleMeasurementControlRow.Annotation.Center;
        circleResult.Radius = circleMeasurementControlRow.Annotation.Radius;
        circleResult.Area = circleMeasurementControlRow.Annotation.Area;
        circleResult.Circumference = circleMeasurementControlRow.Annotation.Circumference;

        circleAnnotations(idx) = circleResult;
    end
    Measurements.CircleAnnotation = circleAnnotations;

    % Write Measurements to base workspace
    assignin("base","Measurements",Measurements);
    uialert(app.EdgeSnappingMeasurementToolFigure, ...
        "Measurements saved to workspace successfully", ...
        "Export Success", ...
        Icon="success");
end
Measure an Image Using App
Run the EdgeSnappingMeasurementApp app.
Import an image either from a file or from the workspace using the options in the Import section of the app toolstrip. If you choose to import the image from a file, the app opens a dialog box enabling you to browse files that have image file formats. If you choose to import the image from the workspace, the app filters workspace variables for potential images and displays the variable names in the drop-down. When you import an image, the app resets and displays the imported image in the Viewer section of the app.
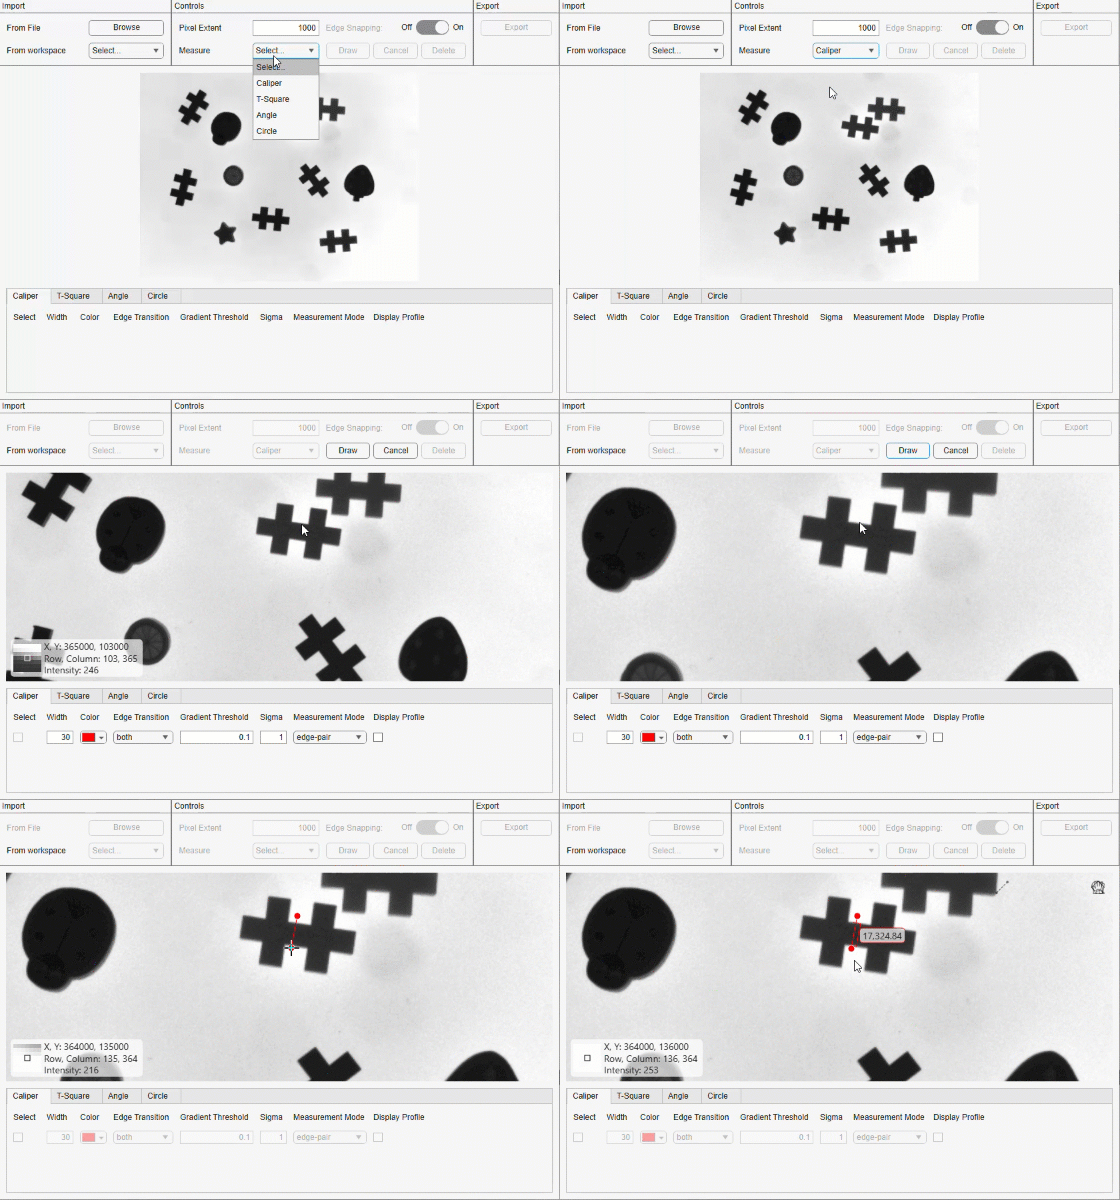
To measure using the caliper measurement, perform these steps.
From the Measure drop-down in the Controls section of the app toolstrip, select
Caliper. Ensure edge-snapping is enabled for more accurate measurement.In the Measurement Parameters and History section, the Caliper tab is active. Specify the desired parameters for the measurement in the Caliper tab.
Select Draw in the Controls section of the app toolstrip. To cancel drawing and start a new measurement, select Cancel.
Select two points on the image in the Viewer section to measure the distance, inter-edge distance, and intra-edge distance.
Right-click to complete the measurement and exit the drawing mode.
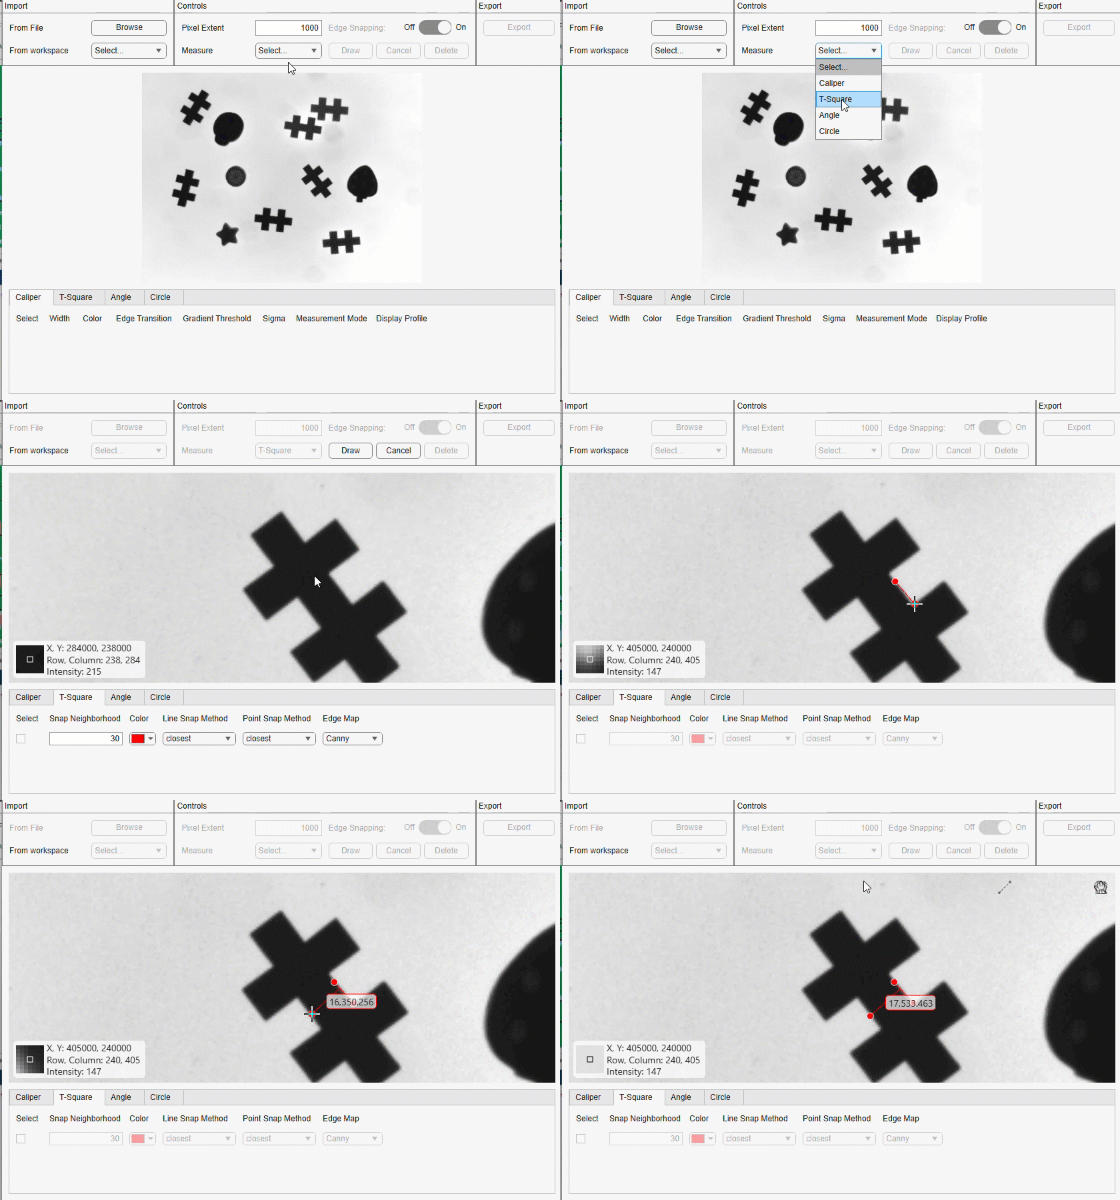
To measure using the T-square measurement, perform these steps.
From the Measure drop-down in the Controls section of the app toolstrip, select
T-Square. Ensure edge-snapping is enabled for more accurate measurement.In the Measurement Parameters and History section, the T-Square tab is active. Specify the desired parameters for the measurement in the T-Square tab.
Select Draw in the Controls section of the app toolstrip. To cancel drawing and start a new measurement, select Cancel.
Select two points on the image in the Viewer section to set the T scale and then select a third point to measure the perpendicular distance.
Right-click to complete the measurement and exit the drawing mode.
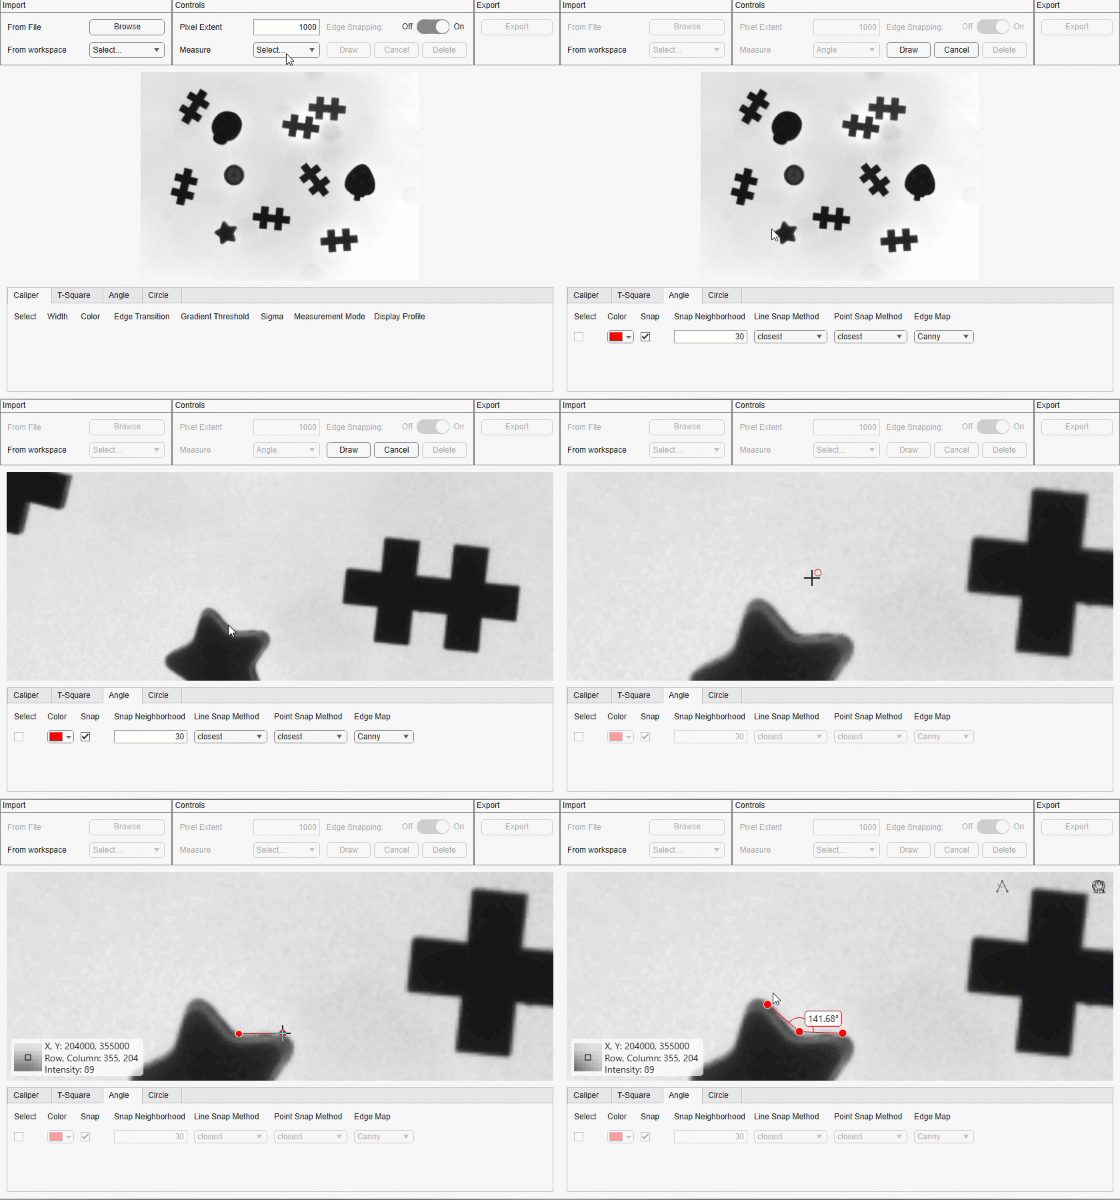
To measure using the angle measurement, perform these steps.
From the Measure drop-down in the Controls section of the app toolstrip, select
Angle. Ensure edge-snapping is enabled for more accurate measurement.In the Measurement Parameters and History section, the Angle tab is active. Specify the desired parameters for the measurement in the Angle tab.
Select Draw in the Controls section of the app toolstrip. To cancel drawing and start a new measurement, select Cancel.
Select a single point on the image in the Viewer section to set the vertex of the angle and then select two more points to set the sides of the angle.
Right-click to complete the measurement and exit the drawing mode.
To measure using the circle measurement, perform these steps.
From the Measure drop-down in the Controls section of the app toolstrip, select
Circle. Ensure edge-snapping is enabled for more accurate measurement.In the Measurement Parameters and History section, the Circle tab is active. Specify the desired parameters for the measurement in the Circle tab.
Select Draw in the Controls section of the app toolstrip. To cancel drawing and start a new measurement, select Cancel.
Click and drag to draw a circle.
Right-click to complete the measurement and exit the drawing mode.
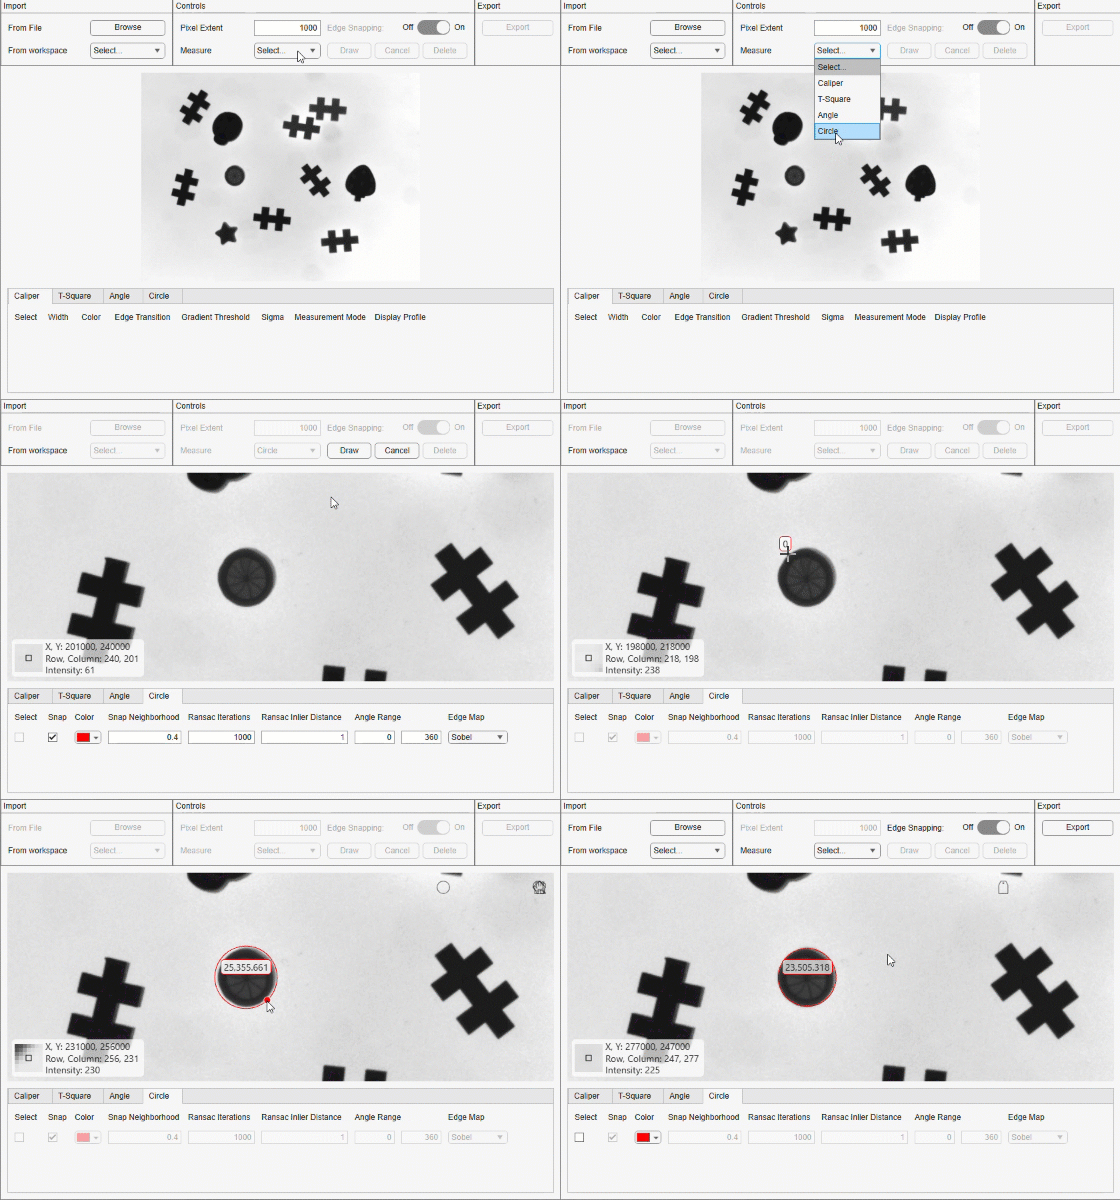
To delete any measurements, select the check box next to those measurements in the corresponding tab of the measurement history, and then select Delete in the Controls section of the app toolstrip. To export all remaining measurements to the workspace, select Export in the Export section of the app toolstrip.
Customize the App
You can customize the code of the EdgeSnappingMeasurementApp app in the attached supporting file. You can support exporting only selected measurements by updating the relevant app methods.
To customize the app, you can choose one of these options:
Open the attached MLAPP files in App Designer and edit the code in the Code View.
Open the attached MLAPP files in App Designer, select Share in the Designer tab and then Export to MATLAB Class (.m), and save the M file. You can then edit the M file.
See Also
Apps
Properties
Functions
imageshow|uicaliper|uitsquare|uifitangle|uifitcircle

