Results for
Los invito a conocer el libro "Sistemas dinámicos en contexto: Modelación matemática, simulación, estimación y control con MATLAB", el cual ya está disponible en formato digital.
El libro integra diversos temas de los sistemas dinámicos desde un punto de vista práctico utilizando programas de MATLAB y simulaciones en Simulink y utilizando métodos numéricos (ver enlace). Existe mucho material en el blog del libro con posibilidades para comentarios, propuestas y correcciones. Resalto los casos de estudio
Creo que el libro les puede dar un buen panorama del área con la posibilidad de experimentar de manera interactiva con todo el material de MATLAB disponible en formato Live Script. Lo mejor es que se pueden formular preguntas en el blog y hacer propuestas al autor de ejercicios resueltos.
Son bienvenidos los comentarios, sugerencias y correcciones al texto.
I noticed recently that my data is no longer updating on thingspeak again. Is there a connectivity issues with thingspeak
my code is as below:
#include "DHT.h"
#define DHTPIN 15 // what pin we're connected to
#define DHTTYPE DHT11
DHT dht(DHTPIN, DHTTYPE);
#define THINGSPEAK_API_KEY "1P4RY69D3YMP9R5W"
#include <SoftwareSerial.h>
#include <OneWire.h>
#include <DallasTemperature.h>
//-----------------------------
#include <ArduinoJson.h>
StaticJsonDocument<200>JsonDocument;
SoftwareSerialmyserial(10, 11);
//-------------------------
float voltage;
unsignedintfrac;
//---------------------
#define ONE_WIRE_BUS 5
OneWireoneWire(ONE_WIRE_BUS);
DallasTemperaturesensors(&oneWire);
floatCelcius = 0;
float Fahrenheit = 0;
//==========================================================================================================
bytesensorInterrupt = 0; // 0 = digital pin 2
bytesensorPin = 2;
// The hall-effect flow sensor outputs approximately 4.5 pulses per second per
// litre/minute of flow.
floatcalibrationFactor = 5.5; //==========================================================we change cal factor 4.5 to 5.5 if not work chnage again(4.5)
//========== 5.5 calibration factor is working efficent then 4.5 , 7.5 ,and 6.5
volatile byte pulseCount;
floatflowRate;
unsignedintflowMilliLitres;
unsigned long totalMilliLitres, tempTotal = -1;
unsigned long oldTime;
//-------------------------------------------------------
intpH_Value;
float Voltage;
//----------------------------------------------------------------------------------------------
void setup() {
// put your setup code here, to run once:
Serial.begin(9600);
myserial.begin(9600);
//--------------------------------
pinMode(sensorPin, INPUT);
digitalWrite(sensorPin, HIGH);
pulseCount = 0;
flowRate = 0.0;
flowMilliLitres = 0;
totalMilliLitres = 0; // ============================================================
oldTime = 0;
attachInterrupt(sensorInterrupt, pulseCounter, FALLING);
sensors.begin();
//------------------------------------------------
/********************GSM Communication Starts********************/
if (myserial.available())
Serial.write(myserial.read());
myserial.println("AT");
delay(1000);
myserial.println("AT+SAPBR=3,1,\"Contype\",\"GPRS\"");
delay(1000);
ShowSerialData();
myserial.println("AT+SAPBR=3,1,\"APN\",\"www\"");//APN
delay(1000);
ShowSerialData();
myserial.println("AT+SAPBR=1,1");
delay(1000);
ShowSerialData();
myserial.println("AT+SAPBR=2,1");
delay(1000);
ShowSerialData();
//---------------------------------
}
void loop() {
// put your main code here, to run repeatedly:
inti;
for (i = 0; i< 20; i++)
{
flow_meter();
}
temperature();
turbidity();
delay(1000);
gsm();
}
voidflow_meter()
{
if ((millis() - oldTime) > 1000) // Only process counters once per second
{
// Disable the interrupt while calculating flow rate and sending the value to
// the host
detachInterrupt(sensorInterrupt);
// Because this loop may not complete in exactly 1 second intervals we calculate
// the number of milliseconds that have passed since the last execution and use
// that to scale the output. We also apply the calibrationFactor to scale the output
// based on the number of pulses per second per units of measure (litres/minute in
// this case) coming from the sensor.
flowRate = ((1000.0 / (millis() - oldTime)) * pulseCount) / calibrationFactor;
// Note the time this processing pass was executed. Note that because we've
// disabled interrupts the millis() function won't actually be incrementing right
// at this point, but it will still return the value it was set to just before
// interrupts went away.
oldTime = millis();
// Divide the flow rate in litres/minute by 60 to determine how many litres have
// passed through the sensor in this 1 second interval, then multiply by 1000 to
// convert to millilitres.
flowMilliLitres = (flowRate / 60) * 1000;
// Add the millilitres passed in this second to the cumulative total
totalMilliLitres += flowMilliLitres;
// Print the flow rate for this second in litres / minute
/* Serial.print("Flow rate: ");
Serial.print(int(flowRate)); // Print the integer part of the variable
Serial.print("."); // Print the decimal point */
// Determine the fractional part. The 10 multiplier gives us 1 decimal place.
frac = (flowRate - int(flowRate)) * 10;
Serial.print(frac, DEC) ; // Print the fractional part of the variable
Serial.println("L/min");
/* // Print the number of litres flowed in this second
Serial.print(" Current Liquid Flowing: "); // Output separator
Serial.print(flowMilliLitres);
Serial.print("mL/Sec");
// Print the cumulative total of litres flowed since starting
Serial.print(" Output Liquid Quantity: "); // Output separator
Serial.print(totalMilliLitres);
Serial.println("mL"); */
if ( tempTotal != totalMilliLitres ) {
tempTotal = totalMilliLitres;
// displayVolumeOfWater(totalMilliLitres );
}
// Reset the pulse counter so we can start incrementing again
pulseCount = 0;
// Enable the interrupt again now that we've finished sending output
attachInterrupt(sensorInterrupt, pulseCounter, FALLING);
}
//=========================================================================================================================
}
voidpulseCounter()
{
// Increment the pulse counter
pulseCount++;
}
//-------------------------------------------------------------------------
void temperature()
{
sensors.requestTemperatures();
Celcius = sensors.getTempCByIndex(0);
Fahrenheit = sensors.toFahrenheit(Celcius);
Serial.print(" C ");
Serial.print(Celcius);
// Serial.print(" F ");
// Serial.println(Fahrenheit);
delay(1000);
}
//------------------------------------------------------------
void turbidity()
{
intsensorValue = analogRead(A0);
voltage = sensorValue * (5.0 / 1024.0);
// Serial.println ("Sensor Output (V):");
Serial.println (voltage);
// Serial.println();
delay(1000);
}
//------------------------------------------------------------
voidgsm()
{
myserial.println("AT+HTTPINIT");
delay(1000);
ShowSerialData();
myserial.println("AT+HTTPPARA=\"CID\",1");
delay(1000);
ShowSerialData();
StaticJsonDocument<200>JsonDocument;
JsonObject& object = JsonDocument.createObject();
object.set("TE", Celcius);
object.set("TU", voltage);
object.set("WF", frac);
delay(1000);
object.printTo(Serial);
Serial.println(" ");
String sendtoserver;
object.prettyPrintTo(sendtoserver);
delay(1000);
//myserial.println("AT+HTTPPARA=\"URL\",\"https://api.thingspeak.com/update?api_key=\""); //Server address
myserial.println("AT+HTTPPARA=\"URL\",\"https://api.thingspeak.com/update?api_key=\""); //Server address
delay(1000);
ShowSerialData();
myserial.println("AT+HTTPPARA=\"CONTENT\",\"application/json\"");
delay(1000);
ShowSerialData();
myserial.println("AT+HTTPDATA=" + String(sendtoserver.length()) + ",100000");
Serial.println(sendtoserver);
delay(1000);
ShowSerialData();
myserial.println(sendtoserver);
delay(2000);
ShowSerialData;
myserial.println("AT+HTTPACTION=1");
delay(1000);
ShowSerialData();
myserial.println("AT+HTTPREAD");
delay(1000);
ShowSerialData();
myserial.println("AT+HTTPTERM");
delay(1000);
ShowSerialData;
}
voidShowSerialData()
{
while (myserial.available() != 0)
Serial.write(myserial.read());
delay(1000);
}
I am very pleased to share my book, with coauthors Professor Richard Davis and Associate Professor Sam Toan, titled "Chemical Engineering Analysis and Optimization Using MATLAB" published by Wiley: https://www.wiley.com/en-us/Chemical+Engineering+Analysis+and+Optimization+Using+MATLAB-p-9781394205363
Also in The MathWorks Book Program:
Chemical Engineering Analysis and Optimization Using MATLAB® introduces cutting-edge, highly in-demand skills in computer-aided design and optimization. With a focus on chemical engineering analysis, the book uses the MATLAB platform to develop reader skills in programming, modeling, and more. It provides an overview of some of the most essential tools in modern engineering design.
Chemical Engineering Analysis and Optimization Using MATLAB® readers will also find:
- Case studies for developing specific skills in MATLAB and beyond
- Examples of code both within the text and on a companion website
- End-of-chapter problems with an accompanying solutions manual for instructors
This textbook is ideal for advanced undergraduate and graduate students in chemical engineering and related disciplines, as well as professionals with backgrounds in engineering design.
My following code works running Matlab 2024b for all test cases. However, 3 of 7 tests fail (#1, #4, & #5) the QWERTY Shift Encoder problem. Any ideas what I am missing?
Thanks in advance.
keyboardMap1 = {'qwertyuiop[;'; 'asdfghjkl;'; 'zxcvbnm,'};
keyboardMap2 = {'QWERTYUIOP{'; 'ASDFGHJKL:'; 'ZXCVBNM<'};
if length(s) == 0
se = s;
end
for i = 1:length(s)
if double(s(i)) >= 65 && s(i) <= 90
row = 1;
col = 1;
while ~strcmp(s(i), keyboardMap2{row}(col))
if col < length(keyboardMap2{row})
col = col + 1;
else
row = row + 1;
col = 1;
end
end
se(i) = keyboardMap2{row}(col + 1);
elseif double(s(i)) >= 97 && s(i) <= 122
row = 1;
col = 1;
while ~strcmp(s(i), keyboardMap1{row}(col))
if col < length(keyboardMap1{row})
col = col + 1;
else
row = row + 1;
col = 1;
end
end
se(i) = keyboardMap1{row}(col + 1);
else
se(i) = s(i);
end
% if ~(s(i) = 65 && s(i) <= 90) && ~(s(i) >= 97 && s(i) <= 122)
% se(i) = s(i);
% end
end
Need code to collect data of waterflow sensor using ESP 8266 and to stoe it in ThingSpeak cloud
Ciao a Tutti,qualche mese fa avevo costruito una stazione meteo con un esp32 e vari sensori.
Tutto funzionava, adesso però ho riprovato, e non funziona più. Ho provato a creare un canale nuovo con nuovo ID canale, nuovo ID Client, nuovo Utente (uguale al Client) e nuova Password. si connette (ho inserito un comando se connesso a MQTT scrivi.....) ma non publica i dati.
Non reisco a saltarne fuori, ècambiato qualche cosa?
grazie a tutti
Currently, according to the official documentation, "DisplayName" only supports character vectors or single scalar string as input. For example, when plotting three variables simultaneously, if I use a single scalar string as input, the legend labels will all be the same. To have different labels, I need to specify them separately using the legend function with label1, label2, label3.
Here's an example illustrating the issue:
x = (1:10)';
y1 = x;
y2 = x.^2;
y3 = x.^3;
% Plotting with a string scalar for DisplayName
figure;
plot(x, [y1,y2,y3], DisplayName="y = x");
legend;
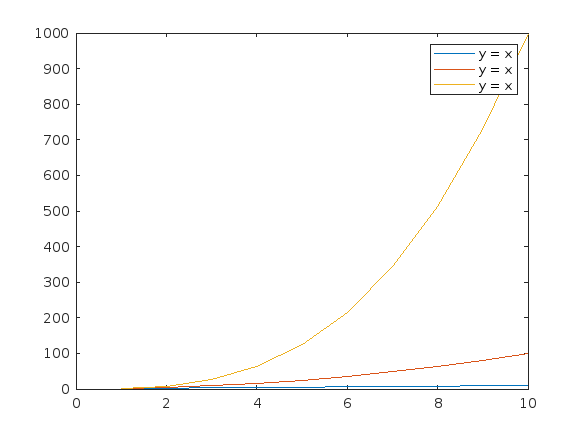
% To have different labels, I need to use the legend function separately
figure;
plot(x, [y1,y2,y3], DisplayName=["y = x","y = x^2","y=x^3"]);
% legend("y = x","y = x^2","y=x^3");
Hello,
could it be that there is currently is a stability problem with the MQTT-Broker? I can establisth a connection successfully using the MQTTX client (web and win64 installation). I tried all possible ports an connection types. It disconnects all the time after a few seconds of establishing a connection successfully. So it was not possible to subscribe any item. I do not think the problem is in my side... By the way, protocol verision 3.1.1 ist supported, 5.0 not, am I right?
Maybe you could give me a hint,
Best regards,
Manfred
Three former MathWorks employees, Steve Wilcockson, David Bergstein, and Gareth Thomas, joined the ArrayCast pod cast to discuss their work on array based languages. At the end of the episode, Steve says,
> It's a little known fact about MATLAB. There's this thing, Gareth has talked about the community. One of the things MATLAB did very, very early was built the MATLAB community, the so-called MATLAB File Exchange, which came about in the early 2000s. And it was where people would share code sets, M files, et cetera. This was long before GitHub came around. This was well ahead of its time. And I think there are other places too, where MATLAB has delivered cultural benefits over and above the kind of core programming and mathematical capabilities too. So, you know, MATLAB Central, File Exchange, very much saw the future.
Listen here: The ArrayCast, Episode 79, May 10, 2024.
This topic is for discussing highlights to the current R2025a Pre-release.
So you've downloaded the R2025a pre-release, tried Dark mode and are wondering what else is new. A lot! A lot is new!
One thing I am particularly happy about is the fact that Apple Accelerate is now the default BLAS on Apple Silicon machines. Check it out by doing
>> version -blas
ans =
'Apple Accelerate BLAS (ILP64)'
If you compare this to R2024b that is using OpenBLAS you'll see some dramatic speed-ups in some areas. For example, I saw up to 3.7x speed-up for matrix-matrix multiplication on my M2 Mabook Pro and 2x faster LU factorisation.
Details regarding my experiments are in this blog post Life in the fast lane: Making MATLAB even faster on Apple Silicon with Apple Accelerate » The MATLAB Blog - MATLAB & Simulink . Back then you had to to some trickery to switch to Apple Accelerate, now its the default.
I just published a blog post called "The Story of TIMEIT." I've been thinking about writing something like this ever since Mike Croucher's tic/toc blog post last spring.
There were a lot of opinions about TIMEIT expressed in the comments of that blog post, including some of mine.
My blog post today gives a more full history of the function, its design goals, and how it works. I thought it might prompt more discussion, so I'm creating this thread as a place for it.
If you are an interested user of TIMEIT, feel free to weigh in here with your thoughts. Perhaps the thread will influence MathWorks regarding what to do with TIMEIT, or with related performance measurement capabilities.
Hi
If you have used the playground and are familiar with its capabilities, I will be very interested in your opinion about the tool.
Thank you in advance for your reply/opinion.
At
Overview
Authors:
- Narayanaswamy P.R. Iyer
- Provides Simulink models for various PWM techniques used for inverters
- Presents vector and direct torque control of inverter-fed AC drives and fuzzy logic control of converter-fed AC drives
- Includes examples, case studies, source codes of models, and model projects from all the chapters.
About this book
Successful development of power electronic converters and converter-fed electric drives involves system modeling, analyzing the output voltage, current, electromagnetic torque, and machine speed, and making necessary design changes before hardware implementation. Inverters and AC Drives: Control, Modeling, and Simulation Using Simulink offers readers Simulink models for single, multi-triangle carrier, selective harmonic elimination, and space vector PWM techniques for three-phase two-level, multi-level (including modular multi-level), Z-source, Quasi Z-source, switched inductor, switched capacitor and diode assisted extended boost inverters, six-step inverter-fed permanent magnet synchronous motor (PMSM), brushless DC motor (BLDCM) and induction motor (IM) drives, vector-controlled PMSM, IM drives, direct torque-controlled inverter-fed IM drives, and fuzzy logic controlled converter-fed AC drives with several examples and case studies. Appendices in the book include source codes for all relevant models, model projects, and answers to selected model projects from all chapters.
This textbook will be a valuable resource for upper-level undergraduate and graduate students in electrical and electronics engineering, power electronics, and AC drives. It is also a hands-on reference for practicing engineers and researchers in these areas.
I want to share a new book "Introduction to Digital Control - An Integrated Approach, Springer, 2024" available through https://link.springer.com/book/10.1007/978-3-031-66830-2.
This textbook presents an integrated approach to digital (discrete-time) control systems covering analysis, design, simulation, and real-time implementation through relevant hardware and software platforms. Topics related to discrete-time control systems include z-transform, inverse z-transform, sampling and reconstruction, open- and closed-loop system characteristics, steady-state accuracy for different system types and input functions, stability analysis in z-domain-Jury’s test, bilinear transformation from z- to w-domain, stability analysis in w-domain- Routh-Hurwitz criterion, root locus techniques in z-domain, frequency domain analysis in w-domain, control system specifications in time- and frequency- domains, design of controllers – PI, PD, PID, phase-lag, phase-lead, phase-lag-lead using time- and frequency-domain specifications, state-space methods- controllability and observability, pole placement controllers, design of observers (estimators) - full-order prediction, reduced-order, and current observers, system identification, optimal control- linear quadratic regulator (LQR), linear quadratic Gaussian (LQG) estimator (Kalman filter), implementation of controllers, and laboratory experiments for validation of analysis and design techniques on real laboratory scale hardware modules. Both single-input single-output (SISO) and multi-input multi-output (MIMO) systems are covered. Software platform of MATLAB/Simlink is used for analysis, design, and simulation and hardware/software platforms of National Instruments (NI)/LabVIEW are used for implementation and validation of analysis and design of digital control systems. Demonstrating the use of an integrated approach to cover interdisciplinary topics of digital control, emphasizing theoretical background, validation through analysis, simulation, and implementation in physical laboratory experiments, the book is ideal for students of engineering and applied science across in a range of concentrations.
I am excited to share my new book "Introduction to Mechatronics - An Integrated Approach, Springer, 2023" available through https://link.springer.com/book/10.1007/978-3-031-29320-7.
This textbook presents mechatronics through an integrated approach covering instrumentation, circuits and electronics, computer-based data acquisition and analysis, analog and digital signal processing, sensors, actuators, digital logic circuits, microcontroller programming and interfacing. The use of computer programming is emphasized throughout the text, and includes MATLAB for system modeling, simulation, and analysis; LabVIEW for data acquisition and signal processing; and C++ for Arduino-based microcontroller programming and interfacing. The book provides numerous examples along with appropriate program codes, for simulation and analysis, that are discussed in detail to illustrate the concepts covered in each section. The book also includes the illustration of theoretical concepts through the virtual simulation platform Tinkercad to provide students virtual lab experience.
I had originally planned on publishing my book via a traditional publisher, but am now reconsidering whether to use Amazon.com. I use Matlab and Latex in my book. It appears that it is not possible to publish is with Amazon due to this. Advice? Thanks. Kevin Passino
Hi everyone
The R2025a pre-release is now available to licensed users. I highly encourage you to download, give it a try and give us some feedback.
The first thing I tried was switching to Dark mode. Here's the magic
>> s = settings;
>> s.matlab.appearance.MATLABTheme.PersonalValue = "Dark";
in the below code write is working fine, but read is failing ( 404 error) can you please help me reslove this.
/*
Go to thingspeak.com and create an account if you don't have one already.
After logging in, click on the "New Channel" button to create a new channel for your data. This is where your data will be stored and displayed.
Fill in the Name, Description, and other fields for your channel as desired, then click the "Save Channel" button.
Take note of the "Write API Key" located in the "API keys" tab, this is the key you will use to send data to your channel.
Replace the channelID from tab "Channel Settings" and privateKey with "Read API Keys" from "API Keys" tab.
Replace the host variable with the thingspeak server hostname "api.thingspeak.com"
Upload the sketch to your ESP32 board and make sure that the board is connected to the internet. The ESP32 should now send data to your Thingspeak channel at the intervals specified by the loop function.
Go to the channel view page on thingspeak and check the "Field1" for the new incoming data.
You can use the data visualization and analysis tools provided by Thingspeak to display and process your data in various ways.
Please note, that Thingspeak accepts only integer values.
You can later check the values at https://thingspeak.com/channels/2005329
Please note that this public channel can be accessed by anyone and it is possible that more people will write their values.
*/
#include <WiFi.h>
const char *ssid = "xxxx"; // Change this to your WiFi SSID
const char *password = "xxxxx"; // Change this to your WiFi password
const char *host = "api.thingspeak.com"; // This should not be changed
const int httpPort = 80; // This should not be changed
const String channelID = "2805914"; // Change this to your channel ID
const String writeApiKey = "xxxxxxxxxxxxxxxx"; // Change this to your Write API key
const String readApiKey = "xxxxxxxxxxxxxxxx"; // Change this to your Read API key
// The default example accepts one data filed named "field1"
// For your own server you can ofcourse create more of them.
int field1 = 20;
//int field1 = 20;
int numberOfResults = 1; // Number of results to be read
int fieldNumber = 1; // Field number which will be read out
void setup() {
Serial.begin(115200);
while (!Serial) {
delay(100);
}
// We start by connecting to a WiFi network
Serial.println();
Serial.println("******************************************************");
Serial.print("Connecting to ");
Serial.println(ssid);
WiFi.begin(ssid, password);
while (WiFi.status() != WL_CONNECTED) {
delay(500);
Serial.print(".");
}
Serial.println("");
Serial.println("WiFi connected");
Serial.println("IP address: ");
Serial.println(WiFi.localIP());
}
void readResponse(NetworkClient *client) {
unsigned long timeout = millis();
while (client->available() == 0) {
if (millis() - timeout > 5000) {
Serial.println(">>> Client Timeout !");
client->stop();
return;
}
}
// Read all the lines of the reply from server and print them to Serial
while (client->available()) {
String line = client->readStringUntil('\r');
Serial.print(line);
}
Serial.printf("\nClosing connection\n\n");
}
void loop() {
NetworkClient client;
String footer = String(" HTTP/1.1\r\n") + "Host: " + String(host) + "\r\n" + "Connection: close\r\n\r\n";
// WRITE --------------------------------------------------------------------------------------------
if (!client.connect(host, httpPort)) {
return;
}
client.print("GET /update?api_key=" + writeApiKey + "&field1=" + field1 + footer);
readResponse(&client);
delay(200);
// READ --------------------------------------------------------------------------------------------
String readRequest = "GET /channels/" + channelID + "/fields/" + fieldNumber + ".json?results=" + numberOfResults + " HTTP/1.1\r\n" + "Host: " + host + "\r\n"
+ "Connection: close\r\n\r\n";
if (!client.connect(host, httpPort)) {
return;
}
client.print(readRequest);
readResponse(&client);
// -------------------------------------------------------------------------------------------------
//++field1;
delay(10000);
}