Design and Train Agent Using Reinforcement Learning Designer
This example shows how to design and train a DQN agent for an environment with a discrete action space using Reinforcement Learning Designer.
Open the Reinforcement Learning Designer App
Open the Reinforcement Learning Designer app.
reinforcementLearningDesigner

Initially, no agents or environments are loaded in the app.
Import Cart-Pole Environment
When using the Reinforcement Learning Designer, you can import an environment from the MATLAB® workspace or create a predefined environment. For more information, see Load MATLAB Environments in Reinforcement Learning Designer and Load Simulink Environments in Reinforcement Learning Designer.
For this example, use the predefined discrete cart-pole MATLAB environment. To import this environment, on the Reinforcement Learning tab, in the Environments section, select New > Discrete Cart-Pole.

In the Environments pane, the app adds the imported
Discrete CartPole environment. To rename the environment, click the
environment text. You can also import multiple environments in the session.
To view the dimensions of the observation and action space, click the environment text. The app shows the dimensions in the Preview pane.
![The Preview pane shows the dimensions of the state and action spaces being [4 1] and [1 1], respectively](app_dqn_cartpole_03b.png)
This environment has a continuous four-dimensional observation space (the positions and velocities of both the cart and pole) and a discrete one-dimensional action space consisting of two possible forces, –10 N or 10 N. This environment is used in the Train Default DQN Agent to Balance Discrete Cart-Pole example. For more information on predefined control system environments, see Use Predefined Control System Environments.
Create DQN Agent for Imported Environment
To create an agent, on the Reinforcement Learning tab, in the Agent section, click New. In the Create agent dialog box, specify the agent name, the environment, and the training algorithm. The default agent configuration uses the imported environment and the DQN algorithm. For this example, change the number of hidden units from 256 to 20. For more information on creating agents, see Create Agents Using Reinforcement Learning Designer.

Click OK.
The app adds the new agent to the Agents pane and opens a corresponding agent1 document.
In the Hyperparameter section, under Critic Optimizer
Options set Learn rate to
0.0001.

For a brief summary of DQN agent features and to view the observation and action specifications for the agent, click Overview.

When you create a DQN agent in Reinforcement Learning Designer, the agent uses a default deep neural network structure for its critic. To view the critic network, on the DQN Agent tab, under Critic, select Analyze Network.
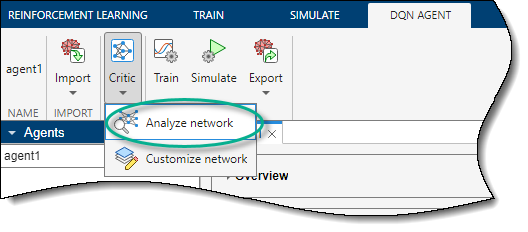
The Deep Learning Network Analyzer opens and displays the critic structure.

Close the Deep Learning Network Analyzer.
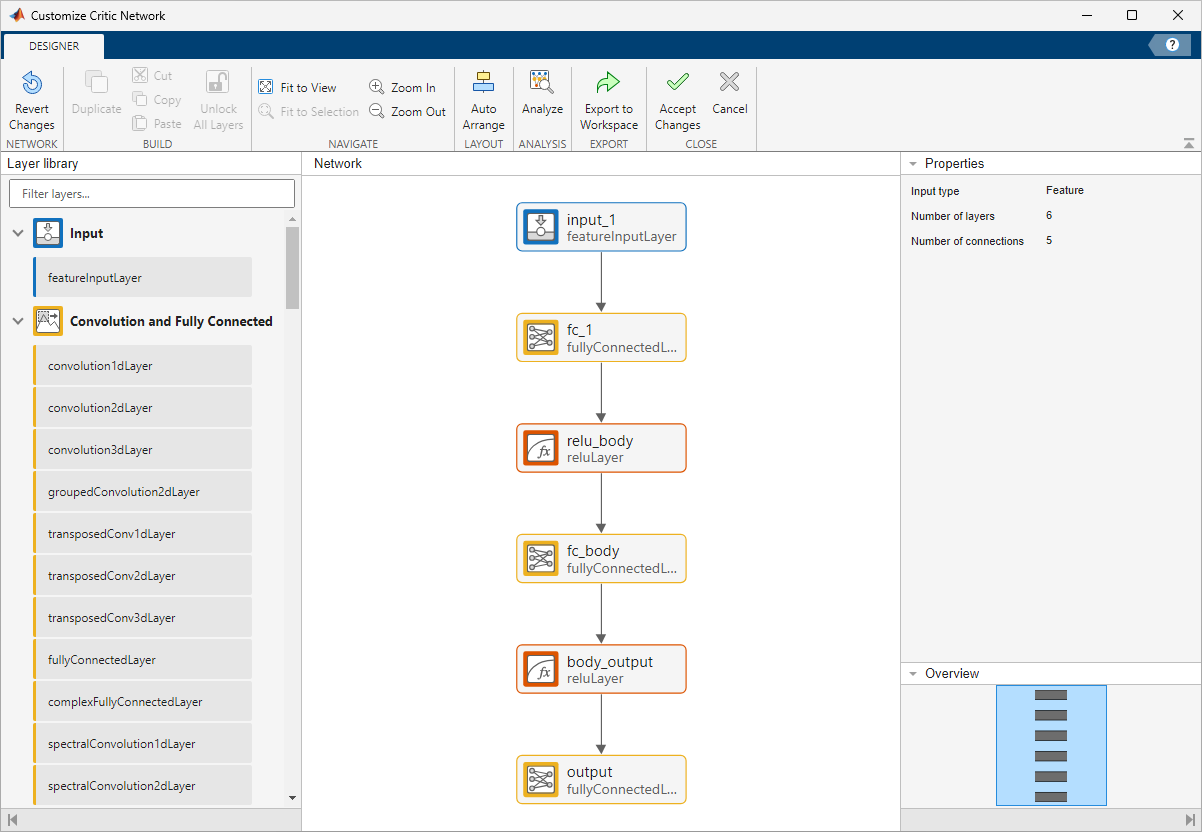
To modify the existing network instead, on the DQN Agent tab, under Critic, select Customize Network.
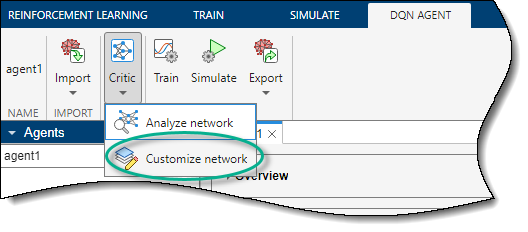
The Deep Network Designer opens and displays the critic structure, which you can modify.
Close the Deep Network Designer.
Train Agent
To train your agent, on the Train tab, first specify options for training the agent. For information on specifying training options, see Specify Simulation Options in Reinforcement Learning Designer.
For this example, specify the maximum number of training episodes by setting
Max Episodes to 1000. For the other training
options, use their default values. The default criteria for stopping is when the average
number of steps per episode (over the last 5 episodes) is greater than
500.

To start training, click Train.
During training, the app opens the Training Session tab and displays the training progress in the Training Results document.
At any time during training, you can click on the Stop or Stop Training buttons to interrupt training and perform other operations on the command line.

At this point the Resume, Accept, and Cancel buttons in the Training Session tab give you the option to resume the training, accept the training results (which stores the training results and the trained agent in the app) or cancel the training altogether, respectively.
To resume training click Resume.

Here, the training stops when the average number of steps per episode is 500.
Note
The training history and results depend on the specific configuration of your hardware, software, and random number generator, and are generally not excactly reproducible. For more information, see Results Reproducibility.
To accept the training results click Accept. In the
Agents pane, the app adds the trained agent,
agent1_Trained.
Simulate Agent and Inspect Simulation Results
To simulate the trained agent, on the Simulate tab, first select
agent1_Trained in the Agent drop-down list, then
configure the simulation options. For this example, use the default number of episodes
(10) and maximum episode length (500). For more
information on specifying simulation options, see Specify Simulation Options in Reinforcement Learning Designer.

To simulate the agent, click Simulate.
The app opens the Simulation Session tab. After the simulation is completed, the Simulation Results document shows the reward for each episode as well as the reward mean and standard deviation.

For three episodes the agent was not able to reach the maximum reward of 500. This
suggests that the robustness of the trained agent to different initial conditions might be
improved. In this case, training the agent longer, for example, by selecting an
Average Window Length of 10 instead of
5, yields better robustness. You can also modify some DQN agent
options such as BatchSize and
TargetUpdateFrequency to promote faster and more robust
learning.
To analyze the simulation results, click Inspect Simulation Data. This opens the Simulation Data Inspector. For more information, see Simulation Data Inspector (Simulink).
You also have the option to preemptively clear from the Simulation Data Inspector any data that you might have loaded in a previous session. To do so, under Inspect Simulation Data, select Clear and Inspect Simulation Data.

In the Simulation Data Inspector you can view the saved signals for each simulation episode.
By default, the upper plot area is selected. To show the first state (the cart
position), during the first episode, under Run 1: Simulation Result,
open the CartPoleStates variable, and select
CartPoleStates(1,1). The cart goes outside the boundary after about
390 seconds, causing the simulation to terminate.

To also show the reward in the upper plot area, select the Reward
variable. Note that the units on the vertical axis change accordingly.
Click the middle plot area, and select the third state (pole angle). Then click the bottom area and select the second and fourth state (cart velocity and pole angle derivative).

For a related example, in which a DQN agent is trained on the same environment, see Train Default DQN Agent to Balance Discrete Cart-Pole.
Close the Simulation Data Inspector.
To accept the simulation results, on the Simulation Session tab, click Accept.
In the Results pane, the app adds the simulation results
structure, experience1.
Export Agent and Save Session
To select the trained agent and open the corresponding
agent1_Trained document, under the Agents
pane, double click on agent1_Trained.

Then, to export the trained agent to the MATLAB workspace, on the Reinforcement Learning tab, under Export, select the trained agent.

To save the app session, on the Reinforcement Learning tab, click Save Session. In the future, to resume your work where you left off, you can open the session in Reinforcement Learning Designer.
Simulate Agent at the Command Line
To simulate the agent at the MATLAB command line, first load the cart-pole environment.
env = rlPredefinedEnv("CartPole-Discrete");The cart-pole environment has an environment visualizer that allows you to see how the system behaves during simulation and training.
Plot the environment and perform a simulation using the trained agent that you previously exported from the app.
plot(env)
xpr2 = sim(env,agent1_Trained);
During the simulation, the visualizer shows the movement of the cart and pole. In this simulation, the trained agent is able to stabilize the system.

Finally, display the cumulative reward for the simulation.
sum(xpr2.Reward)
env =
   500
As expected, the cumulative reward is 500.
See Also
Apps
Functions
Topics
- Train Default DQN Agent to Balance Discrete Cart-Pole
- Tune Hyperparameters Using Reinforcement Learning Designer
- Create DQN Agent Using Deep Network Designer and Train Using Image Observations
- Load MATLAB Environments in Reinforcement Learning Designer
- Load Simulink Environments in Reinforcement Learning Designer
- Create Agents Using Reinforcement Learning Designer
- Specify Training Options in Reinforcement Learning Designer
- Specify Simulation Options in Reinforcement Learning Designer
- Deep Q-Network (DQN) Agent
- Train Reinforcement Learning Agents