Start a Classification Learner or Regression Learner Session
When you first launch the Classification Learner or Regression Learner app, you can start the app session by doing one of the following:
Importing data from the workspace
Importing data from a file
Opening a saved app session
You can also start an app session by importing a trained model and its training data from the workspace. For more information, see Import a Trained Model from the Workspace.
Import Data from Workspace
You can start a Classification Learner and Regression Learner app session by importing predictor and response data from workspace variables. For example data sets that you can use, see Statistics and Machine Learning Toolbox Example Data Sets and MATLAB Example Data Sets.
Predictor and response variables can be numeric, categorical, string, or logical
vectors, cell arrays of character vectors, or character arrays. A variable cannot
contain all NaN values.
In Classification Learner, the response variable cannot contain more than 500 unique class labels. In Regression Learner, the response variable must be a floating-point vector (single or double precision).
Combine the predictor data into one workspace variable, either a table or matrix. You can additionally combine your predictor data and response variable, or you can keep them separate.
Tip
The easiest way to import your data into the app is to use a table,
because tables can contain numeric and label data. Bring your data from a
file into the MATLAB® workspace as a table, or use the table functions to create a
table from workspace variables. For more
information, see Tables.
If you prefer loading data and validation partitions into the app directly
from the command line, you can specify the predictor data, response
variable, and validation scheme to use in the command line call to
classificationLearner or
regressionLearner. For more information, see Classification Learner or Regression Learner.
Load your data into the MATLAB workspace.
In the MATLAB Command Window, enter
classificationLearnerorregressionLearner.On the Learn tab of the app, in the File section, select New Session > From Workspace Data.
In the New Session from Workspace Data dialog box, under Data Set Variable, select a table or matrix from the list of workspace variables.
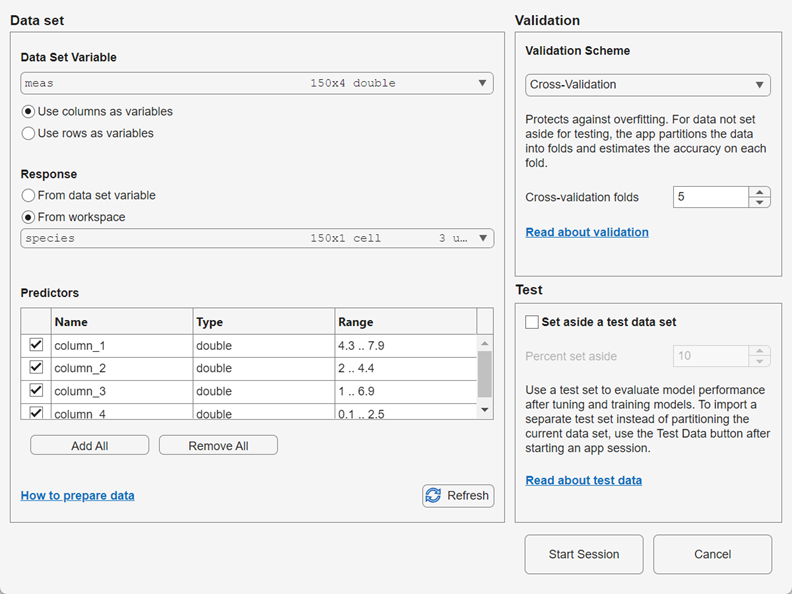
If you select a matrix, specify whether to use rows or columns as variables by clicking an option button in the Data Set Variable section.
Under Response, observe the default response variable. The app attempts to select a suitable response variable from the data set variable and treats all other variables as predictors.
If you want to use a different response variable, you can:
Click the From data set variable option button and use the list to select another variable from the data set variable.
Select a separate workspace variable by clicking the From workspace option button and then selecting a workspace variable from the list. The list contains only variables that have a vector of the same length as the data set variable.
Under Predictors, add or remove predictors using the check boxes. Add or remove all predictors by clicking Add All or Remove All. You can also add or remove multiple predictors by selecting the rows in the table and clicking Add Selected or Remove Selected.
Select a validation scheme to protect against overfitting. The default validation option is 5-fold cross-validation, which protects against overfitting.
Tip
If you are importing a large data set, you might want to select holdout validation. To learn more, see Select Validation Scheme in Classification Learner or Regression Learner.
You can optionally set aside a portion of your data to use as a test data set before any validation partitioning occurs. The test data set is not used in model training or validation. For more information, see Test Trained Models in Classification Learner or Regression Learner.
Click Start Session to start a new app session with the selected options.
Import Data from File
You can start a Classification Learner and Regression Learner app session by
importing predictor and response data from various types of file, including
spreadsheets, comma separated values (.csv), and text files. You
cannot directly import a .mat file into the app. To load data
contained in a .mat file, first load the data into the
MATLAB workspace, and then follow the steps in Import Data from the Workspace.
On the Learn tab, in the File section, select New Session > From Data File.
Select a file type in the list, or select All Data Files to browse for other file types, such as
.txt.Click Open. If necessary, adjust the import options in the Import Tool window, and then click Import Selection.
In the New Session from Data File dialog box, under Response, observe the default response variable. The app tries to select a suitable response variable from the data set and treats all other variables as predictors. You can use the list to select another variable to use as the response variable. The list includes only variables that contain a vector of the same length as the data set variable.
Under Predictors, add or remove predictors using the check boxes. Add or remove all predictors by clicking Add All or Remove All. You can also add or remove multiple predictors by selecting the rows in the table and clicking Add Selected or Remove Selected.
Select a validation scheme to protect against overfitting. The default validation option is 5-fold cross-validation, which protects against overfitting.
Tip
If you are importing a large data set, you might want to select holdout validation. To learn more, see Select Validation Scheme in Classification Learner or Regression Learner.
You can optionally set aside a portion of your data to use as a test data set before any validation partitioning occurs. The test data set is not used in model training or validation. For more information, see Test Trained Models in Classification Learner or Regression Learner.
Click Start Session to start a new app session with the selected options.
Open Saved App Session
After you launch Classification Learner or Regression Learner, you can open a previously saved app session. On the Learn tab, in the File section, click Open Session. In the Select File to Open dialog box, select the saved session you want to open. Click Open.
You can also open a saved app session by launching the learner app at the command
line using classificationLearner(filename) or
regressionLearner(filename). The filename
argument, specified as a character vector or string scalar, must include the name of
an app session file and the path to the file, if it is not in the current folder.
The file must have the extension .mat.
Note
You must have a Deep Learning Toolbox™ license to load a saved app session that contains customizable neural network models. If you do not have Deep Learning Toolbox, you can load the other supported models and data from the saved session file into a new session by clicking Load supported models and data in the Session File Contains Unsupported Models dialog box.
To save a current app session, click Save Session in the File section of the Learn tab. When you first save the current session, you must specify the session file name and the file location. The Save Session option saves the current session, and the Save Session As option saves the current session to a new file. When you select the Save Compact Session As option:
The app saves a compact version of the current session, which typically results in a smaller file because it does not include the training data.
The app permanently deletes the training data from all current trained models (that is, the app makes the models compact). Note that when you export a compact trained model to the workspace using Export > Export Model to Workspace, you cannot start a new session from that trained model using New Session > From Trained Model.
The app preserves the training data set in the current session, meaning you can still create and train draft models, and then export them to the workspace as full (not compact) models.
For next steps, see Train Classification Models in Classification Learner App and Train Regression Models in Regression Learner App.