wt.radio.N320
R2026bDescription
The
wt.radio.N320
object provides an interface with a USRP™ N320 radio that corresponds to a radio setup configuration you saved using
the Radio Setup
wizard.
Refer to the object properties to get information about the radio setup configuration that the object corresponds to, such as the model number of the radio, the radio IP address, and the synchronization options.
Use object functions to:
Check the lock status of the reference clock, local oscillators, or GPS disciplined oscillator (GPSDO) on the radio.
Get time and GPS information from the radio.
Synchronize multiple devices by setting the radio time.
Schedule property updates on Wireless Testbench™ application objects and
usrpSystem objects.Configure GPIO pins for automatic transmit/receive (ATR) behavior or manual GPIO control.
You can use the wt.radio.N320 radio object to
create a Wireless Testbench application object to configure your radio for baseband transmit and capture or
spectrum monitoring applications. You can also use this radio object to create a usrp
System object™ for controlling your radio in targeting workflows.
Creation
To create a radio object, use the radioConfigurations
function with the name of a radio configuration created using the Radio Setup
wizard:
radio = radioConfigurations("MyRadio")Properties
Object Functions
Examples
Call the radioConfigurations function to list all saved radio setup configurations.
configs = radioConfigurations;
Create a radio object by specifying the name of a saved radio setup configuration.
radioName = configs(1).Name
radioName =
"MyRadio"
radio = radioConfigurations(radioName);
Synchronize the radio time on two NI USRP radios that share a clock and time source.
Create Radio Objects
Create a radio object for each radio, specifying a radio setup configuration previously saved using the Radio Setup wizard.
radio1 = radioConfigurations("MyRadio")radio1 =
N320 with properties:
Name: "MyRadio"
Hardware: "USRP N320"
IPAddress: "192.168.20.2"
ClockSource: "external"
TimeSource: "external"
LOSource: "internal"
radio2 = radioConfigurations("MyRadio2")radio2 =
N321 with properties:
Name: "MyRadio2"
Hardware: "USRP N321"
IPAddress: "192.168.21.2"
ClockSource: "external"
TimeSource: "external"
LOSource: "internal"
LOExported: 0
LODistributed: 0
Create and Configure Application Object or usrp System Object
After you create your radio objects and before you synchronize the radio time, you should fully configure your radio. Connecting to the radio to load an application or update an RF property resets the radio time.
To configure one or both of your radios using a baseband or detector application object, use the corresponding radio object as the radio input argument when you create the object. Additionally, specify the Preload name-value argument as true and specify all RF properties using the PropertyName=Value syntax. The commented code shows an example.
% bbtrx = basebandTransceiver(radio, ...
%     Preload=true, ...
%     TransmitDataType="double", ...
%     TransmitAntennas="RFA:TX/RX", ...
%     TransmitCenterFrequency=2.4e9, ...
%     TransmitRadioGain=10, ...
%     CaptureAntennas="RFA:RX2", ...
%     CaptureCenterFrequency=2.4e9, ...
%     CaptureRadioGain=10);
To connect to and control one or both of your radios with a custom FPGA image that you created by using the Target NI USRP Radios Workflow, use the corresponding radio object as the radio input argument when you create a usrp System object. Then, run all the code required to configure your radio, your DUT, and the interfaces between them, up to the point where you call the setup function on your usrp System object. The commented code shows an example.
% device = usrp(radio, ...
%     SampleRate=250e6, ...
%     TransmitAntennas="DB0:RF0:TX/RX0", ...
%     TransmitDDRAllocation=1000);
% programFPGA(device,"myBitstream.bit","myDeviceTree.dts");
% describeFPGA(device,"ModelName_wthandoffinfo.mat");
% dut = fpga(device);
% addRFNoCRegisterInterface(dut, ...
%     "InterfaceID","DUTName", ...
%     "RFNoCBlock","0/DUTName#0");
% DUTPort_Read_Register = hdlcoder.DUTPort("Read_Register", ...
%     "Direction","OUT", ...
%     "DataType","int16", ...
%     "IsComplex",false, ...
%     "Dimension",[1 1], ...
%     "IOInterface","DUTName", ...
%     "IOInterfaceMapping",1);
% mapPort(dut,DUTPort_Read_Register);
% setup(device);
You can now proceed to synchronize the radio time.
Synchronize Radio Time
To synchronize both radios to use a common radio time, set the radio time on both radios to the same value on the next PPS signal. First, use the getTimeLastPPS function to get the time that the last PPS occurred.
tLastPPS = getTimeLastPPS(radio1);
When a PPS signal is detected, you have one second to set a new radio time. Check for a new signal every 0.1 seconds, then use the setTimeNextPPS function to set the radio time on both radios to zero.
while tLastPPS == getTimeLastPPS(radio1)
    pause(0.1)
end
setTimeNextPPS(radio1,0);
setTimeNextPPS(radio2,0);
To verify that the radio time is synchronized, verify that the last PPS signal occurred at the same time on both radios.
pause(1.1)
tLastPPS1 = getTimeLastPPS(radio1);
tLastPPS2 = getTimeLastPPS(radio2);
isequal(tLastPPS1,tLastPPS2)
ans = logical
   0
If the radio time synchronization is unsuccessful, try running this code section again.
Create a radio object, specifying a radio setup configuration previously saved using the Radio Setup wizard.
radio = radioConfigurations("MyRadio");Create a baseband transceiver object, specifying your radio object. Specify the Preload name-value argument as true to load the application onto the radio during object creation. Specify RF properties for the transmit and receive channels.
bbtrx = basebandTransceiver(radio, ...
    Preload=true, ...
    TransmitDataType="double", ...
    TransmitAntennas="RFA:TX/RX", ...
    TransmitCenterFrequency=2.4e9, ...
    TransmitRadioGain=10, ...
    CaptureAntennas="RFA:RX2", ...
    CaptureCenterFrequency=2.4e9, ...
    CaptureRadioGain=10);
Set the time for synchronously applying changes to RF properties as 2 seconds in the future.
cmdTime = getRadioTime(radio)+2
cmdTime =
2.1484
Transmit a waveform continuously.
transmit(bbtrx,[-1;0;1;0],"continuous");Schedule a 0.2 second long background capture to start 0.1 seconds before the scheduled command time.
capture(bbtrx,seconds(0.2),Background=true,StartTime=cmdTime-0.1);
Set the command time and verify.
setCommandTime(radio,cmdTime)
getCommandTime(radio)
ans =
2.1484
Update the transmit and capture radio gains to 20 dB. These changes take effect synchronously at the command time.
bbtrx.TransmitRadioGain = 20;
bbtrx.CaptureRadioGain = 20;
Clear the command time. This takes effect immediately after the scheduled property updates take effect.
clearCommandTime(radio);
Wait for the capture operation to complete.
while isCapturing(bbtrx)
    pause(0.1)
end
Return the captured data to the workspace.
data = captureOutputs(bbtrx);
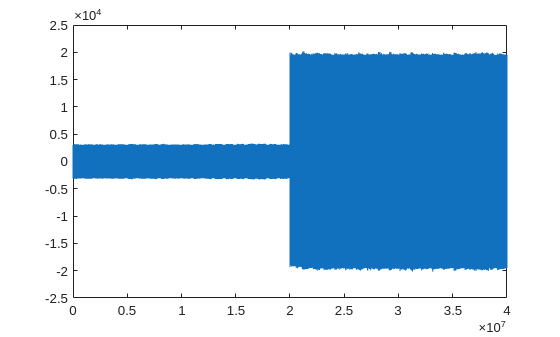
Plot the captured data. The plot shows the data captured 0.1 seconds either side of the command time.
plot(real(data))
Configure a GPIO signal for ATR operation and set the output state for each radio condition by following these steps:
Select the GPIO bank on the radio and assign a radio source to the GPIO signal that you want to control.
Enable ATR operation on the selected GPIO signal by setting the control and direction attribute register values.
Configure the GPIO output state for each radio state by setting the ATR attribute register values.
Select GPIO Bank and Source
Create a radio object and assign a radio source to the GPIO signal that you want to control. Update the source and signal indices to match your hardware configuration. In this example, "RF2" drives the second GPIO signal based on the state of the radio front end.
radio = radioConfigurations("MyRadio");
banks = getGPIOBanks(radio);
disp(banks)
FP0
gpioBank = banks(1);
sources = getAvailableGPIOSources(radio,gpioBank);
disp(sources)
    "PS"
    "RF0"
    "RF1"
    "RF2"
    "RF3"
radioSource = sources(4);
signalIndex = 2;

srcMap = getGPIOSource(radio,gpioBank);
srcMap(signalIndex) = radioSource;
setGPIOSource(radio,gpioBank,srcMap);
Enable ATR Operation
Enable ATR operation on the selected GPIO signal and set its direction to output. Each attribute is a bitmask. Use bitset to modify only the target signal without affecting other signals.
% Resolve attribute bank and signal index for USRP X410 radios
if strcmp(radio.Hardware,"USRP X410")
    attrBank = "GPIO";
    if strcmp(gpioBank,"GPIO1")
        attrSignalIndex = signalIndex + 12;
    else
        attrSignalIndex = signalIndex;
    end
else
    attrBank = gpioBank;
    attrSignalIndex = signalIndex;
end

ctrl = getGPIOAttribute(radio,attrBank,radioSource,"CTRL");
setGPIOAttribute(radio,attrBank,radioSource,"CTRL",bitset(ctrl,attrSignalIndex,1));

ddr = getGPIOAttribute(radio,attrBank,radioSource,"DDR");
setGPIOAttribute(radio,attrBank,radioSource,"DDR",bitset(ddr,attrSignalIndex,1));
Set ATR Masks
Define the GPIO output state for each radio state. In this example, the signal drives high during transmit and full-duplex state, and low when idle or receiving.
% Drive signal low when idle
atr0x = getGPIOAttribute(radio,attrBank,radioSource,"ATR_0X");
setGPIOAttribute(radio,attrBank,radioSource,"ATR_0X",bitset(atr0x,attrSignalIndex,0));

% Drive signal low when receiving
atrRx = getGPIOAttribute(radio,attrBank,radioSource,"ATR_RX");
setGPIOAttribute(radio,attrBank,radioSource,"ATR_RX",bitset(atrRx,attrSignalIndex,0));

% Drive signal high when transmitting
atrTx = getGPIOAttribute(radio,attrBank,radioSource,"ATR_TX");
setGPIOAttribute(radio,attrBank,radioSource,"ATR_TX",bitset(atrTx,attrSignalIndex,1));

% Drive signal high in full-duplex state
atrXx = getGPIOAttribute(radio,attrBank,radioSource,"ATR_XX");
setGPIOAttribute(radio,attrBank,radioSource,"ATR_XX",bitset(atrXx,attrSignalIndex,1));
The GPIO signal now updates automatically as the radio transitions between states.

